Step 1) Setup environment vaiables (Using csh):
# setenv PATH \
/usr/sfw/bin:/usr/local/bin:/usr/bin:/bin
# setenv PATH \
${PATH}:/usr/ccs/bin:/usr/sbin:/opt/sfw/bin:.
# setenv LD_LIBRARY_PATH \
/usr/sfw/lib:/usr/local/lib:/opt/sfw/lib
Step 2) Configure and install perl (Install location will be /usr/local/perl587)
# gtar xfz perl-5.8.7.tar.gz
# cd perl-5.8.7
# rm -f config.sh Policy.sh
# sh Configure -Dcc='gcc -B/usr/ccs/bin/' \
-Dprefix=/usr/local/perl587 -des
# make
# make test
# make install
# cd ..
# cp /usr/local/perl587/bin/perl /usr/local/bin
Step 3) Check perl has been install and is in your path.
# rehash
# which perl
/usr/local/bin/perl
# perl -V
Summary of my perl5 (revision 5 version 8 subversion 7) configuration:
Platform:
osname=solaris, osvers=2.10, archname=sun4-solaris
... a lot more stuff....
Step 4) Install some basic perl modules (down load from: http://search.cpan.org/)
# gtar xfz HTML-Tagset-3.04.tar.gz
# cd HTML-Tagset-3.04
# perl Makefile.PL
# make
# make test
# make install
# cd ..
# gtar xfz HTML-Parser-3.46.tar.gz
# cd HTML-Parser-3.46
# perl Makefile.PL
# make
# make test
# make install
# cd ..
# gtar xfz URI-1.35.tar.gz
# cd URI-1.35
# perl Makefile.PL
# make
# make test
# make install
# cd ..
# gtar xfz Compress-Zlib-1.41.tar.gz
# cd Compress-Zlib-1.41
# perl Makefile.PL
# make
# make test
# make install
# cd ..
# gtar xfz libwww-perl-5.803.tar.gz
# cd libwww-perl-5.803
# perl Makefile.PL -n
# make
# make test
# make install
# cd ..
Step 5) Set up mod_perl (Need to extract apache files first, since it updates them):
# gtar xfz apache_1.3.34.tar.gz
# gtar xfz mod_perl-1.29.tar.gz
# cd mod_perl-1.29
# perl Makefile.PL \
APACHE_SRC=../apache_1.3.34/src \
DO_HTTPD=1 USE_APACI=1 \
PREP_HTTPD=1 EVERYTHING=1
# make
# make install
Step 6) Previous step did not compile apache. I prefer it that way:
# ./configure --prefix=/usr/local/Apache/1334 \
--enable-module=info \
--enable-module=most --enable-shared=max \
--enable-module=status \
--enable-module=so \
--activate-module=src/modules/perl/libperl.a
# make
# make install
Step 7) We will pause here, since if you try to start the apache server you will get an error if this is on a SPARC platform.
# /usr/local/Apache/1334/bin/apachectl start
Syntax error on line 210 of /usr/local/Apache/1334/conf/httpd.conf:
Cannot load /usr/local/Apache/1334/libexec/mod_negotiation.so into server: ld.so.1: httpd: fatal: relocation error: file /usr/local/Apache/1334/libexec/mod_negotiation.so: symbol __floatdisf: referenced symbol not found
/usr/local/Apache/1334/bin/apachectl start: httpd could not be started
Step 8) SKIP to "step 9" if you are on a x86 platform.
# cd src/modules/proxy
# ld -G -o mod_proxy.so mod_proxy.lo \
`gcc -print-libgcc-file-name`
# cd ../standard
# ld -G -o mod_negotiation.so mod_negotiation.lo \
`gcc -print-libgcc-file-name`
# cd ../../..
# make
# make install
Wednesday, December 31, 2008
NFS server configuration on solaris 10
The network file system (NFS)
NFS iss the system that can be used to access file systems over the network. NFS version 4 is the default NFS in Solaris 10. The NFS service is managed by the Service Management Facility. That means NFS can be managed (enabled, disabled, or restarted) by the svcadm command, and the status of NFS service can be obtained by using the svcs command. The benefit here is sharing files over the network among computers possibly running different operating systems.
The NFS Service
The NFS service is a network service that enables computers of different architectures running different operating systems to share file systems across the network. A wide spectrum of operating systems ranging from Windows to Linux/UNIX support NFS. It has become possible to implement the NFS environment on a variety of operating systems because it is defined as an abstract model of a file system, rather than an architectural specification. Each operating system applies the NFS model to its specific file system semantics. This means that file system operations such as reading and writing work for the users as if they were accessing a file on the local system.
The benefits of the NFS service are described here:
1) It enables users on the network to share data, because all computers on the network can access the same set of files.
2) It reduces storage costs by letting computers share applications and common files instead of needing local disk space on each computer for each common file and user application.
3) It provides data consistency and reliability, because all users can read the same set of files, and whenever changes are made, they are made only at one place.
4) It makes the mounting of file systems accessing the remote files transparent to users.
5) It supports heterogeneous environments and reduces system administration overhead.
NFS is a network service offered in the client/server environment
NFS Servers and Clients
The NFS is a client/server system, the terms client and server refer to the roles that computers assume in sharing resources (file systems in this case) on the network. In NFS, computers that make their file systems available over the network and thereby offer NFS service to serve the requested files are acting as NFS servers, and the computers that are accessing the file systems are acting as NFS clients. In the NFS framework, a computer on a network can assume the role of a client, a server, or both.
Here is how NFS works:
A server makes a file system on its disk available for sharing, and the file system can then be accessed by an NFS client: on the network.
A client accesses files on the server's shared file system by mounting the file system.
The client does not make a copy of the file system on the server; instead, the mounting process uses a series of remote procedure calls that enable the client to access the file system transparently on the server's disk. To the user, the mounting works just like a mount on the local machine.
Once the remote file system (on the server) is mounted on the client machine, the user types commands as though the file systems were local.
You can mount an NFS file system automatically with autoFS.
The NFS File Systems
In most UNIX system environments, a file hierarchy that can be shared by using the NFS service corresponds to a file system or a portion of a file system. However, a file system resides on a single operating system, and NFS support works across operating systems. Moreover, the concept of a file system might be meaningless in some non-UNIX environments. Therefore, the term file system in NFS refers to a file or a file hierarchy that can be shared and mounted in the NFS environment.
An NFS server can make a single file or a directory subtree (file hierarchy) available to the NFS service for sharing. A server cannot share a file hierarchy that overlaps with a file hierarchy that is already being shared. Note that peripheral devices such as modems and printers cannot be shared under NFS.
Managing NFS
Since the release of Solaris 9, the NFS server starts automatically when you boot the system. Nevertheless, you do need to manage NFS, which includes administering the NFS service, working with NFS daemons, and making file systems available for sharing.
Administering the NFS Service
When the system is booted, the NFS server is automatically started by executing the nfs.server scripts. However, when the system is up, you may need to stop the service or start it again for whatever reason without rebooting the system. For that, you need to know that the NFS service is managed by the Service Management Facility (SMF) under the identifier network/nfs/server. By means of this identifier, you can find the status of the service by using the svcs command, and you can start (enable) or stop (disable) the service by using the svcadm command.
You can determine whether the NFS service is running on your machine by issuing the command shown here:
# svcs network/nfs/server
This command displays whether the NFS service is online or disabled. If you want to stop (disable) the service, issue the following command:
# svcadm disable network/nfs/server
You can start the service by issuing the following command:
# svcadm enable network/nfs/server
When the system is up, some daemons are running to support the NFS service.
Working with NFS Daemons
Since the release of Solaris 9, NFS service starts automatically when the system is booted. When the system goes into level 3 (or multiuser mode), several NFS daemons are started to support the service.
Daemons automatically started in NFS version 4 when the system boots Daemon
Description
automountd - Handles mount and unmount requests from the autofs service.
nfsd - Handles file system requests from clients.
nfs4cbd - Manages the communication endpoints for the NFS version 4 callback program.
nfsmapid - Provides integer-to-String and string-to-integer conversions for the user ID (UID) and the group ID (GID).
The nfsd daemon handles the file system requests from the client and is automatically started with option -a. You can change the parameters of the command by editing the /etc/default/nfs file. The syntax for the nfsd command is as follows:
nfsd [-a] [-c {#_conn}] [-l {listenBacklog}] [-p {protocol}] [-t {device}]
[{nservers}]
The options and parameters are described here:
-a. Start the daemon over all available connectionless and connection-oriented transport protocols such as TCP and UDP. This is equivalent to setting the NFSD_PROTOCOL parameter in the nfs file to ALL.
-c (#_conn.) Set the maximum number of connections allowed to the NFS server over connection-oriented transport protocols such as TCP. By default, the number is unlimited. The equivalent parameter in the nfs file is NFSD_MAX_CONNECTIONS.
-l (listenBacklog). Set the connection queue length (specified by (listenBacklog)) for the number of entries for the NFS TCP. The default value is 32. This number can also be determined by setting the NFSD_LISTEN_BACKLOG parameter in the nfs file.
-p (protocol). Start the daemon over the protocol specified by (protocol). The default in NFS version 4 is TCP. The equivalent parameter in the nfs file is: NFSD_PROTOCOL.
-t (device). Start an nfs daemon for the transport specified by. The equivalent parameter in the nfs file is: NFSD_DEVICES.
(nservers). Set the maximum number of concurrent requests from the clients that the NFS server can handle. The equivalent parameter in the nfs file is: NFSD_SERVERS.
The default NFS version is version 4 in Solaris 10, Unlike previous versions of NFS, NFS version 4 does not use these daemons: lockd, mountd, nfslogd, and statd
Sharing File Systems
On the server machine, you can make a file system available for sharing by using the share command on the machine. You can use this command manually for testing purpose or to make a file system available only until the system is rebooted. If you want to make the sharing of a file system permanent and automatic, you should enter the share command into the /etc/dfs/dfstab file. Each entry of this file is a share command, and this file is automatically executed at boot time when the system enters run level 3. The syntax for the share command is shown here:
share [-F (FSType)] [-o (specificOptions)] [-d (description)] [(pathname)]
The options are described here:
-F (FSType). Specifies the file system type, such as nfs.
-o (specificOptions). The (specificOptions) specifies the options for controlling access to the shared file system. The possible values for (specificOptions) are as follows:
rw. Read/write permissions for all clients. This is the default behavior.
rw = (client1):(client2). . . . Read/write permission for the listed clients; no access for any other client.
ro. Read-only permission for all clients.
ro = (client1):(client2). . . . Read-only permission for the listed clients; no access for any other client.
-d (description). The (description) specifies the description for the shared resource.
If you want to know the resources being shared on the local server, issue the dfshares command without any arguments or options.
Files related to the NFS service
/etc/default/autofs - Configuration information for autofs.
/etc/default/fs - Lists the default file system type for local file systems.
/etc/default/nfs - Configuration information for the nfsd daemon.
/etc/dfs/dfstab - Contains a list of local resources to be shared; the share commands.
/etc/mnttab - Lists file systems that are currently mounted.
/etc/dfs/sharetab - Lists the local and remote resources that are shared.
/etc/vfstab - Defines file systems to be mounted locally.
Some Examples how to share files in NFS
# vi /etc/dfs/dfstab
share -F nfs -o ro,anon=0 /cdrom/sol_10_305_sparc/s0/Solaris_10/Tools - to share the cdrom OS software and read only permission.
share -F nfs -o rw,anon=0 /cdrom - to share files with read and write permission and anon=0 means access to all hosts.
share -F nfs -o rw=hostname1 /cdrom - to give access to only one host.
share -F nfs -o rw=-hostname1 /cdrom - to deny this hostname1 and access to all.
share -F nfs -o rw=hostname1 hostname2 /cdrom - access to hostname1 and hostname2
share -F nfs -o rw=-hostname1 -hostname2 /cdrom - deny hostname1 and hostname2 and allow access to all computer in the network.
wq!
# Shareall (or)
#exportfs -va - to export the filesystem
#share - to see the files shared in nfs and which are exported currently
Client side mount the shared File system
# mount -f nfs hostname1:/cdrom /cdrom - mount shared file directory to local directory.
# cd /cdrom
# ls
NFS iss the system that can be used to access file systems over the network. NFS version 4 is the default NFS in Solaris 10. The NFS service is managed by the Service Management Facility. That means NFS can be managed (enabled, disabled, or restarted) by the svcadm command, and the status of NFS service can be obtained by using the svcs command. The benefit here is sharing files over the network among computers possibly running different operating systems.
The NFS Service
The NFS service is a network service that enables computers of different architectures running different operating systems to share file systems across the network. A wide spectrum of operating systems ranging from Windows to Linux/UNIX support NFS. It has become possible to implement the NFS environment on a variety of operating systems because it is defined as an abstract model of a file system, rather than an architectural specification. Each operating system applies the NFS model to its specific file system semantics. This means that file system operations such as reading and writing work for the users as if they were accessing a file on the local system.
The benefits of the NFS service are described here:
1) It enables users on the network to share data, because all computers on the network can access the same set of files.
2) It reduces storage costs by letting computers share applications and common files instead of needing local disk space on each computer for each common file and user application.
3) It provides data consistency and reliability, because all users can read the same set of files, and whenever changes are made, they are made only at one place.
4) It makes the mounting of file systems accessing the remote files transparent to users.
5) It supports heterogeneous environments and reduces system administration overhead.
NFS is a network service offered in the client/server environment
NFS Servers and Clients
The NFS is a client/server system, the terms client and server refer to the roles that computers assume in sharing resources (file systems in this case) on the network. In NFS, computers that make their file systems available over the network and thereby offer NFS service to serve the requested files are acting as NFS servers, and the computers that are accessing the file systems are acting as NFS clients. In the NFS framework, a computer on a network can assume the role of a client, a server, or both.
Here is how NFS works:
A server makes a file system on its disk available for sharing, and the file system can then be accessed by an NFS client: on the network.
A client accesses files on the server's shared file system by mounting the file system.
The client does not make a copy of the file system on the server; instead, the mounting process uses a series of remote procedure calls that enable the client to access the file system transparently on the server's disk. To the user, the mounting works just like a mount on the local machine.
Once the remote file system (on the server) is mounted on the client machine, the user types commands as though the file systems were local.
You can mount an NFS file system automatically with autoFS.
The NFS File Systems
In most UNIX system environments, a file hierarchy that can be shared by using the NFS service corresponds to a file system or a portion of a file system. However, a file system resides on a single operating system, and NFS support works across operating systems. Moreover, the concept of a file system might be meaningless in some non-UNIX environments. Therefore, the term file system in NFS refers to a file or a file hierarchy that can be shared and mounted in the NFS environment.
An NFS server can make a single file or a directory subtree (file hierarchy) available to the NFS service for sharing. A server cannot share a file hierarchy that overlaps with a file hierarchy that is already being shared. Note that peripheral devices such as modems and printers cannot be shared under NFS.
Managing NFS
Since the release of Solaris 9, the NFS server starts automatically when you boot the system. Nevertheless, you do need to manage NFS, which includes administering the NFS service, working with NFS daemons, and making file systems available for sharing.
Administering the NFS Service
When the system is booted, the NFS server is automatically started by executing the nfs.server scripts. However, when the system is up, you may need to stop the service or start it again for whatever reason without rebooting the system. For that, you need to know that the NFS service is managed by the Service Management Facility (SMF) under the identifier network/nfs/server. By means of this identifier, you can find the status of the service by using the svcs command, and you can start (enable) or stop (disable) the service by using the svcadm command.
You can determine whether the NFS service is running on your machine by issuing the command shown here:
# svcs network/nfs/server
This command displays whether the NFS service is online or disabled. If you want to stop (disable) the service, issue the following command:
# svcadm disable network/nfs/server
You can start the service by issuing the following command:
# svcadm enable network/nfs/server
When the system is up, some daemons are running to support the NFS service.
Working with NFS Daemons
Since the release of Solaris 9, NFS service starts automatically when the system is booted. When the system goes into level 3 (or multiuser mode), several NFS daemons are started to support the service.
Daemons automatically started in NFS version 4 when the system boots Daemon
Description
automountd - Handles mount and unmount requests from the autofs service.
nfsd - Handles file system requests from clients.
nfs4cbd - Manages the communication endpoints for the NFS version 4 callback program.
nfsmapid - Provides integer-to-String and string-to-integer conversions for the user ID (UID) and the group ID (GID).
The nfsd daemon handles the file system requests from the client and is automatically started with option -a. You can change the parameters of the command by editing the /etc/default/nfs file. The syntax for the nfsd command is as follows:
nfsd [-a] [-c {#_conn}] [-l {listenBacklog}] [-p {protocol}] [-t {device}]
[{nservers}]
The options and parameters are described here:
-a. Start the daemon over all available connectionless and connection-oriented transport protocols such as TCP and UDP. This is equivalent to setting the NFSD_PROTOCOL parameter in the nfs file to ALL.
-c (#_conn.) Set the maximum number of connections allowed to the NFS server over connection-oriented transport protocols such as TCP. By default, the number is unlimited. The equivalent parameter in the nfs file is NFSD_MAX_CONNECTIONS.
-l (listenBacklog). Set the connection queue length (specified by (listenBacklog)) for the number of entries for the NFS TCP. The default value is 32. This number can also be determined by setting the NFSD_LISTEN_BACKLOG parameter in the nfs file.
-p (protocol). Start the daemon over the protocol specified by (protocol). The default in NFS version 4 is TCP. The equivalent parameter in the nfs file is: NFSD_PROTOCOL.
-t (device). Start an nfs daemon for the transport specified by
(nservers). Set the maximum number of concurrent requests from the clients that the NFS server can handle. The equivalent parameter in the nfs file is: NFSD_SERVERS.
The default NFS version is version 4 in Solaris 10, Unlike previous versions of NFS, NFS version 4 does not use these daemons: lockd, mountd, nfslogd, and statd
Sharing File Systems
On the server machine, you can make a file system available for sharing by using the share command on the machine. You can use this command manually for testing purpose or to make a file system available only until the system is rebooted. If you want to make the sharing of a file system permanent and automatic, you should enter the share command into the /etc/dfs/dfstab file. Each entry of this file is a share command, and this file is automatically executed at boot time when the system enters run level 3. The syntax for the share command is shown here:
share [-F (FSType)] [-o (specificOptions)] [-d (description)] [(pathname)]
The options are described here:
-F (FSType). Specifies the file system type, such as nfs.
-o (specificOptions). The (specificOptions) specifies the options for controlling access to the shared file system. The possible values for (specificOptions) are as follows:
rw. Read/write permissions for all clients. This is the default behavior.
rw = (client1):(client2). . . . Read/write permission for the listed clients; no access for any other client.
ro. Read-only permission for all clients.
ro = (client1):(client2). . . . Read-only permission for the listed clients; no access for any other client.
-d (description). The (description) specifies the description for the shared resource.
If you want to know the resources being shared on the local server, issue the dfshares command without any arguments or options.
Files related to the NFS service
/etc/default/autofs - Configuration information for autofs.
/etc/default/fs - Lists the default file system type for local file systems.
/etc/default/nfs - Configuration information for the nfsd daemon.
/etc/dfs/dfstab - Contains a list of local resources to be shared; the share commands.
/etc/mnttab - Lists file systems that are currently mounted.
/etc/dfs/sharetab - Lists the local and remote resources that are shared.
/etc/vfstab - Defines file systems to be mounted locally.
Some Examples how to share files in NFS
# vi /etc/dfs/dfstab
share -F nfs -o ro,anon=0 /cdrom/sol_10_305_sparc/s0/Solaris_10/Tools - to share the cdrom OS software and read only permission.
share -F nfs -o rw,anon=0 /cdrom - to share files with read and write permission and anon=0 means access to all hosts.
share -F nfs -o rw=hostname1 /cdrom - to give access to only one host.
share -F nfs -o rw=-hostname1 /cdrom - to deny this hostname1 and access to all.
share -F nfs -o rw=hostname1 hostname2 /cdrom - access to hostname1 and hostname2
share -F nfs -o rw=-hostname1 -hostname2 /cdrom - deny hostname1 and hostname2 and allow access to all computer in the network.
wq!
# Shareall (or)
#exportfs -va - to export the filesystem
#share - to see the files shared in nfs and which are exported currently
Client side mount the shared File system
# mount -f nfs hostname1:/cdrom /cdrom - mount shared file directory to local directory.
# cd /cdrom
# ls
Booting process in solaris 10
Booting process in solaris 10
The first question while giving any interview in solaris is what is the booting process in solaris or what is the boot phase in solaris.
Even to understand solaris clearly and to trouble shoot most of the things we need to know the booting process so that we can encounter where exactly is the problem we are getting.
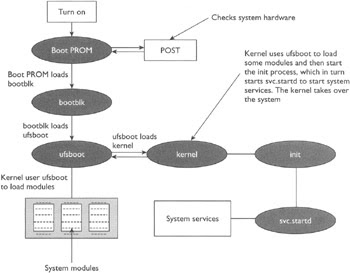
The Boot Phases
The different phases of the boot process on SPARC-based systems are described here:
(I) Boot PROM phase.
The PROM displays the system identification information and then runs power-on self test (POST), which is a diagnostics routine that scans the system to verify the installed hardware and memory. POST runs diagnostics on hardware devices and builds a device tree, which is a data structure describing the devices attached to the system. After the completion of POST, the PROM loads the primary boot program bootblk.
(II) Boot programs phase.
The bootblk program loaded by PROM finds the secondary boot program ufsboot located in the UFS file system on the default boot device and loads it into the memory.
(III) Kernel initialization phase.
The ufsboot program loads the kernel into the memory. The kernel initializes itself and uses the ufsboot program to locate and load OS modules to control the system. A module is a piece of software with a specific functionality, such as interfacing with a particular hardware device. After loading enough modules to mount the root (/) file system, the kernel umnaps the ufsboot program and continues gaining control of the system. At the end of the kernel initialization phase, the kernel starts the /sbin/init process.
(IV) The init phase.
The init phase starts when, after initializing itself, the kernel starts the /sbin/init process, which in turn starts /lib/svc/bin/svc.startd to start the system services to do the following:
Check and mount file systems.
Configure network and devices.
Start various processes and perform tasks related to system maintenance.
The svc.startd process also executes run control (rc) scripts for backward compatibility. The steps in the boot process are illustrated in
Thanks
Naveen
The first question while giving any interview in solaris is what is the booting process in solaris or what is the boot phase in solaris.
Even to understand solaris clearly and to trouble shoot most of the things we need to know the booting process so that we can encounter where exactly is the problem we are getting.
The Boot Phases
The different phases of the boot process on SPARC-based systems are described here:
(I) Boot PROM phase.
The PROM displays the system identification information and then runs power-on self test (POST), which is a diagnostics routine that scans the system to verify the installed hardware and memory. POST runs diagnostics on hardware devices and builds a device tree, which is a data structure describing the devices attached to the system. After the completion of POST, the PROM loads the primary boot program bootblk.
(II) Boot programs phase.
The bootblk program loaded by PROM finds the secondary boot program ufsboot located in the UFS file system on the default boot device and loads it into the memory.
(III) Kernel initialization phase.
The ufsboot program loads the kernel into the memory. The kernel initializes itself and uses the ufsboot program to locate and load OS modules to control the system. A module is a piece of software with a specific functionality, such as interfacing with a particular hardware device. After loading enough modules to mount the root (/) file system, the kernel umnaps the ufsboot program and continues gaining control of the system. At the end of the kernel initialization phase, the kernel starts the /sbin/init process.
(IV) The init phase.
The init phase starts when, after initializing itself, the kernel starts the /sbin/init process, which in turn starts /lib/svc/bin/svc.startd to start the system services to do the following:
Check and mount file systems.
Configure network and devices.
Start various processes and perform tasks related to system maintenance.
The svc.startd process also executes run control (rc) scripts for backward compatibility. The steps in the boot process are illustrated in

Thanks
Naveen
Basic Boot PROM Commands
Basic Boot PROM Commands
ok boot cdrom - To boot from CD-ROM drive
ok boot disk - To boot from hard disk
ok boot floppy - To boot from 3.5 inch diskette drive
ok boot net - To boot from network( basically used for Custom Jumpstart
ok tape for SCSI tape
ok boot cdrom - To boot from CD-ROM drive
ok boot disk - To boot from hard disk
ok boot floppy - To boot from 3.5 inch diskette drive
ok boot net - To boot from network( basically used for Custom Jumpstart
ok tape for SCSI tape
Important open boot commands in solaris OBP commands
Basic Boot PROM Commands
When the system is turned on or reset, it first runs POST, and then one of the following two things can happen:
The system will automatically reboot if the value of the configuration variable auto-boot? is true, the value of the boot-command variable is boot, and OpenBoot is not in diagnostic mode. In order to boot, the system will automatically load, and executes the program and its arguments specified by the boot-file variable from the device described by the boot-device variable.
If the configuration variable auto-boot? is false, the system may stop at the OpenBoot user interface without booting the system and will display the ok prompt.
You can issue the Boot PROM commands at the ok prompt. One obvious command is the boot command to boot the system, which you can use in one of the following ways:
Issue the boot command without any arguments if you want to boot the system from the default boot device using the default boot arguments.
Issue the boot command with an explicit boot device as an argument if you want to boot the system from the specified boot device using the default boot arguments.
Issue the boot command with explicit boot arguments if you want to boot the system from the default device by using the specified arguments.
Issue the boot command with an explicit boot device and with explicit arguments if you want to boot the system from the specified device with the specified arguments.
The general syntax of the boot command is shown here:
boot [device] [arguments]
Arguments and options are described here:
{device}. Specifies the full path or the alias for the boot device. The typical values are:
ok cdrom for CD-ROM drive
ok disk for hard disk
ok floppy for 3.5 inch diskette drive
ok net for network
ok tape for SCSI tape
{arguments}. Specify the arguments for the boot command such as the name of the file that contains the program that will be started as a result of the command. The name is relative to the selected device and partition. If this argument is not specified, the boot program uses the value of the NVRAM parameter: boot-file.
In addition to the boot command there are other administrative and diagnostic commands that you can issue at the Boot PROM prompt: ok. The commonly used OpenBoot PROM commands issued from the ok prompt are described below
ok banner - Displays current power-on banner. (-h ) can be used
ok boot [arguments] [options] - Boots the system.
ok boot - Boots with default options.
ok .enet-addr - Displays current Ethernet address of the machine.
ok .version - Displays the version of the Boot PROM
ok eject media - Ejects the media.
ok eject floppy
ok eject cdrom
ok eject tape
ok help [category]
ok help [command]
ok help [command]
The help command without arguments displays a list of command categories, and, with a category as an argument, displays help for all the commands in that category.
Example :- ok help setenv - Displays help for the setenv command.
ok password - Sets the security password.
ok printenv - Displays a table showing the boot configuration variable names, their current values, and default values.
ok reset-all - Resets the system. It's equivalent to performing a power cycle.
ok set-default [varName] - Sets the value of the specified variable to its default value.
Example :- ok set-default auto-boot?
ok setenv [varName] [value] - Sets the value of a boot configuration variable.
Example - ok auto-boot? false
ok show-devs - Displays the list of all the devices in the OpenBoot device tree.
ok test [device] - Tests the specified device. No message displayed means test succeeded.
Example -
ok test floppy
ok test cdrom
ok test /memory
ok test tape
ok probe-scsi-all - to see all scsi based hardware.
Rebooting the Hung System
In order to reboot the hung system and force a crash dump, perform the following steps. This procedure will work even if the system is not hung.
Press the stop key sequence for your system. The specific stop key sequence depends on your keyboard type. For example, it could be Stop-A or L1-A. On terminals, press the Break key. The system will go to the PROM phase and display the ok prompt.
Synchronize the file systems and write the crash dump.
1)> n
ok sync
After the crash dump has been written to disk, the system will continue to reboot.
Verify that the system boots to run level 3. The login prompt is displayed when the boot process has finished successfully.
[login prompt]:
Login as root, and issue the following command to force a crash dump:
halt -d
At the ok prompt, issue the boot command to boot the system:
ok boot
Making boot device alias
In case system can not boot from primary disk and it is needed to make another boot disk to access the data , nvalias command is used .
nvalias command makes the device alias and assigns an alternate name to a physical disk. Physical address of target disk is required which can be had by show-disk command on ok>.
ok nvalias disk7 /iommu@f,e0000000/sbus@f,e0001000/dma@3,81000/esp@3,80000/sd2,0
The new aliased disk can be named as boot disk or can be used for booting by refering its name .
ok setenv boot-device disk7
ok reset
or
ok boot disk7
Friday, December 19, 2008
Creation of user and group in solaris10
Creation of user and group in solaris10
From command mode :-
#groupadd -g gid groupname- to create a new group
eg:- groupadd -g 200 newgroup
#more /etc/groups
to check if the group is created
#useradd -u-g -d /export/home/userhomedirectory -m -s /bin/sh username
eg:- useradd -u 200 -g 200 -d /export/home/naveen -m -s /bin/sh naveen.
#passwd naveen
enter passwd
#more /etc/passwd
#more /etc/shadow
-This is used to check the user and passwd entries are available.
GUI MODE :-
Type SMC at command mode
#smc - solaris management console

2)Double click user tab
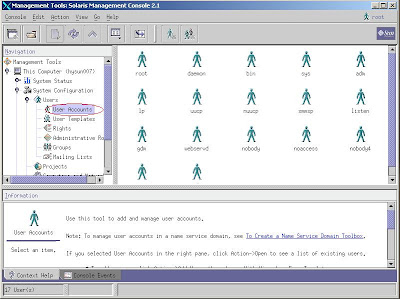
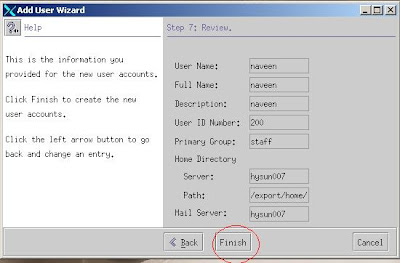
3)Click on the create user option and enter the information
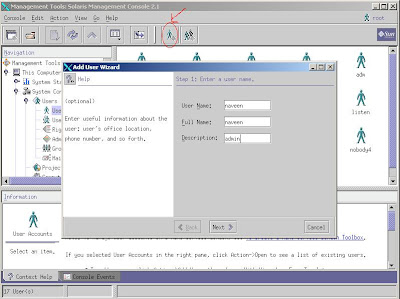
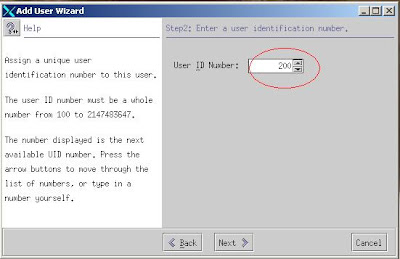
4)Enter user id .
5)Enter Password.
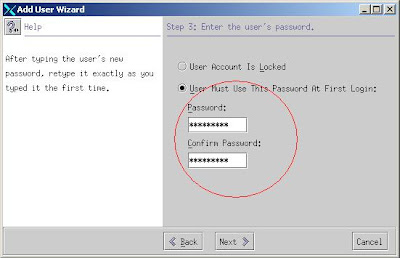
6)Enter group.
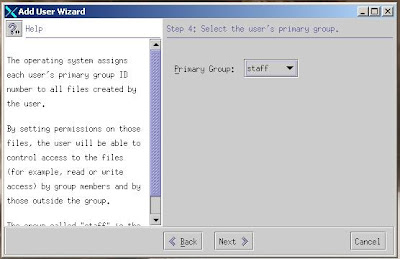
7)Enter Home Directory.
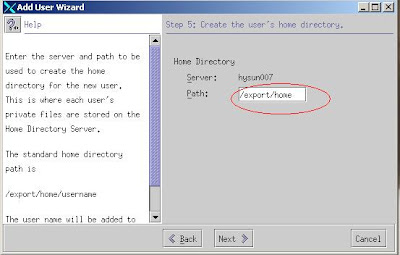
8)Enter default Mail server path.
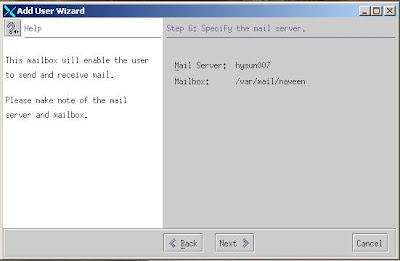
9)Click finish and user is created same way u can also create group.
For testing #su - naveen - if you are trying to login from root it will not ask for passwd so use #telnet localhost and enter username and passwd.
Thanks & Regards
Naveen
From command mode :-
#groupadd -g gid groupname
eg:- groupadd -g 200 newgroup
#more /etc/groups
to check if the group is created
#useradd -u
eg:- useradd -u 200 -g 200 -d /export/home/naveen -m -s /bin/sh naveen.
#passwd naveen
enter passwd
#more /etc/passwd
#more /etc/shadow
-This is used to check the user and passwd entries are available.
GUI MODE :-
Type SMC at command mode
#smc - solaris management console

2)Double click user tab

3)Click on the create user option and enter the information

4)Enter user id .

5)Enter Password.

6)Enter group.

7)Enter Home Directory.

8)Enter default Mail server path.

9)Click finish and user is created same way u can also create group.
For testing #su - naveen - if you are trying to login from root it will not ask for passwd so use #telnet localhost and enter username and passwd.

Thanks & Regards
Naveen
Subscribe to:
Posts (Atom)

Custom Search