Solaris Questions and Answers http://solarisinterview.blogspot.com/
Deploying MYSQL on solaris E-book
Rules to Download :-
1)Always Donate the user who created this site.
2)The Video is in Swf format so download and click it and open it with IE.
3)All files are shared on a Third Party website so register with them for free to download the files.
4)Distribute this site to other so that every one gain free knowledge.
5)Leave a comment of the site which encourge me to devop more.
Download - Deploying MYSQL on solaris E-book
Subscribe with a valid E-mail id so that you can get the latest updates posted in this site in your e-mails.
solaris interview questions and answers for all versions
Header Ad Banner
Wednesday, December 23, 2009
Solaris ZFS administration Videos
Solaris Questions and Answers http://solarisinterview.blogspot.com/
Solaris ZFS administration Videos
Rules to Download :-
1)Always Donate the user who created this site.
2)The Video is in Swf format so download and click it and open it with IE.
3)All files are shared on a Third Party website so register with them for free to download the files.
4)Distribute this site to other so that every one gain free knowledge.
5)Leave a comment of the site which encourge me to devop more.
Download -
Link1
Link2
Link3
Link4
Download all the 4 links and then start you study all the best
Naveen Kumar
Subscribe with a valid E-mail id so that you can get the latest updates posted in this site in your e-mails.
Solaris ZFS Administration E-book
Solaris Questions and Answers http://solarisinterview.blogspot.com/
Solaris ZFS Administration E-book
Rules to Download :-
1)Always Donate the user who created this site.
2)Some Video is in Swf format so download and click it and open it with IE.
3)All files are shared on a Third Party website so register with them for free to download the files.
4)Distribute this site to other so that every one gain free knowledge.
5)Leave a comment of the site which encourge me to devop more.
Download - Solaris ZFS Administration E-book
Subscribe with a valid E-mail id so that you can get the latest updates posted in this site in your e-mails.
Solaris ZFS Administration E-book
Rules to Download :-
1)Always Donate the user who created this site.
2)Some Video is in Swf format so download and click it and open it with IE.
3)All files are shared on a Third Party website so register with them for free to download the files.
4)Distribute this site to other so that every one gain free knowledge.
5)Leave a comment of the site which encourge me to devop more.
Download - Solaris ZFS Administration E-book
Subscribe with a valid E-mail id so that you can get the latest updates posted in this site in your e-mails.
Thursday, July 23, 2009
Solaris Zones Installation Video
Solaris Questions and Answers http://solarisinterview.blogspot.com/
Solaris Zones Installation Video
Rules to Download :-
1)Always Donate the user who created this site.
2)The Video is in Swf format so download and click it and open it with IE.
3)All files are shared on a Third Party website so register with them for free to download the files.
4)Distribute this site to other so that every one gain free knowledge.
5)Leave a comment of the site which encourge me to devop more.
Download - Solaris Zones Installation Video
Subscribe with a valid E-mail id so that you can get the latest updates posted in this site in your e-mails.
Solaris Zones configuration Video
Solaris Questions and Answers http://solarisinterview.blogspot.com/
Solaris Zones configuration Video
Rules to Download :-
1)Always Donate the user who created this site.
2)The Video is in Swf format so download and click it and open it with IE.
3)All files are shared on a Third Party website so register with them for free to download the files.
4)Distribute this site to other so that every one gain free knowledge.
5)Leave a comment of the site which encourge me to devop more.
Download - Solaris Zones configuration Video
Subscribe with a valid E-mail id so that you can get the latest updates posted in this site in your e-mails.
Solaris Zones configuration Video
Rules to Download :-
1)Always Donate the user who created this site.
2)The Video is in Swf format so download and click it and open it with IE.
3)All files are shared on a Third Party website so register with them for free to download the files.
4)Distribute this site to other so that every one gain free knowledge.
5)Leave a comment of the site which encourge me to devop more.
Download - Solaris Zones configuration Video
Subscribe with a valid E-mail id so that you can get the latest updates posted in this site in your e-mails.
Solaris Zone configuration
The SolarisTM Zones facility in the Solaris Operating System provides an isolated environment in which to run applications on your system. Solaris Zones are a component of the Solaris Container environment.
Solaris Containers is Sun's operating system virtualization technique. A Solaris Container is the combination of system resource controls and the boundary separation provided by zones. Zones act as completely isolated virtual servers within a single operating system instance. By consolidating multiple sets of application services onto one system by placing each into isolated virtual server containers, system administrators can reduce cost and provide all the same protections of separate machines on a single machine.
ZFS uses a pooled storage model in which storage capacity is held within an expandable pool called a zpool. Multiple file systems can exist within a zpool and they can share the capacity and IO resources of the pool. This new architectural approach, the storage version of virtual memory, permits easier administration of File systems and enables performance breakthroughs
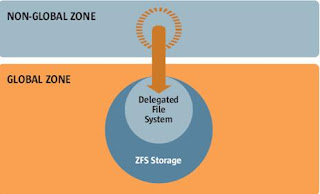
Containers let you isolate ZFS file systems.
When To use Zones
Zones are ideal for environments that consolidate a number of applications on a single server. The cost and complexity of managing numerous machines make it advantageous to consolidate several applications on larger, more scalable servers.
The following figure shows a system with four zones. Each of the zones apps, users, and work is running a workload unrelated to the workloads of the other zones, in a sample consolidated environment. This example illustrates that different versions of the same application can be run without negative consequences in different zones, to match the consolidation requirements. Each zone can provide a customized set of services.
How Zones Work
A non-global zone can be thought of as a box. One or more applications can run in this box without interacting with the rest of the system. Solaris zones isolate software applications or services by using flexible, software-defined boundaries. Applications that are running in the same instance of the Solaris Operating System can then be managed independently of one other. Thus, different versions of the same application can be run in different zones, to match the requirements of your configuration.
A process assigned to a zone can manipulate, monitor, and directly communicate with other processes that are assigned to the same zone. The process cannot perform these functions with processes that are assigned to other zones in the system or with processes that are not assigned to a zone. Processes that are assigned to different zones are only able to communicate through network APIs. The global zone is the only zone from which a non-global zone can be configured, installed, managed, or uninstalled. Only the global zone is bootable from the system hardware. Administration of the system infrastructure, such as physical devices, routing in a shared-IP zone, or dynamic reconfiguration (DR), is only possible in the global zone. Appropriately privileged processes running in the global zone can access objects associated with other zones.
Unprivileged processes in the global zone might be able to perform operations not allowed to privileged processes in a non-global zone. For example, users in the global zone can view information about every process in the system. If this capability presents a problem for your site, you can restrict access to the global zone.
Each zone, including the global zone, is assigned a zone name. The global zone always has the name global. Each zone is also given a unique numeric identifier, which is assigned by the system when the zone is created.
How to configure a zone.
Note that the only required elements to create a native non-global zone are the zonename and zonepath properties. Other resources and properties are optional. Some optional resources also require choices between alternatives, such as the decision to use either the dedicated-cpu resource or the capped-cpu resource.
You must be the global administrator in the global zone to perform this procedure.
1. Become superuser, or assume the Primary Administrator role
• Set up a zone configuration with the zone name you have chosen.
The name my-zone is used in this example procedure.
global# zonecfg -z my-zone
If this is the first time you have configured this zone, you will see the following system message:
my-zone: No such zone configured
Use 'create' to begin configuring a new zone.
• Create the new zone configuration.
This procedure uses the Sun default settings.
zonecfg:my-zone> create
• Set the zone path, /export/home/my-zone in this procedure.
zonecfg:my-zone> set zonepath=/export/home/my-zone
Do not place the zonepath on ZFS for this release.
• Set the autoboot value.
If set to true, the zone is automatically booted when the global zone is booted. Note that for the zones to autoboot, the zones service svc:/system/zones:default must also be enabled. The default value is false.
zonecfg:my-zone> set autoboot=true
• Set persistent boot arguments for a zone.
zonecfg:my-zone> set bootargs="-m verbose"
• Dedicate one CPU to this zone.
zonecfg:my-zone> add dedicated-cpu
a. Set the number of CPUs.
zonecfg:my-zone:dedicated-cpu> set ncpus=1-2
b. (Optional) Set the importance.
zonecfg:my-zone:dedicated-cpu> set importance=10
c. The default is 1.
d. End the specification.
zonecfg:my-zone:dedicated-cpu> end
• Revise the default set of privileges.
zonecfg:my-zone> set limitpriv="default,sys_time"
This line adds the ability to set the system clock to the default set of privileges.
• Set the scheduling class to FSS.
zonecfg:my-zone> set scheduling-class=FSS
• Add a memory cap.
zonecfg:my-zone> add capped-memory
a. Set the memory cap.
zonecfg:my-zone:capped-memory> set physical=50m
b. Set the swap memory cap.
zonecfg:my-zone:capped-memory> set swap=100m
c. Set the locked memory cap.
zonecfg:my-zone:capped-memory> set locked=30m
d. End the memory cap specification.
zonecfg:my-zone:capped-memory> end
• Add a file system.
zonecfg:my-zone> add fs
a. Set the mount point for the file system, /usr/local in this procedure.
zonecfg:my-zone:fs> set dir=/usr/local
b. Specify that /opt/local in the global zone is to be mounted as /usr/local in the zone being configured.
zonecfg:my-zone:fs> set special=/opt/local
c. In the non-global zone, the /usr/local file system will be readable and writable.
d. Specify the file system type, lofs in this procedure.
zonecfg:my-zone:fs> set type=lofs
e. The type indicates how the kernel interacts with the file system.
f. End the file system specification.
zonecfg:my-zone:fs> end
This step can be performed more than once to add more than one file system.
• Add a ZFS dataset named sales in the storage pool tank.
zonecfg:my-zone> add dataset
a. Specify the path to the ZFS dataset sales.
zonecfg:my-zone> set name=tank/sales
b. End the dataset specification.
zonecfg:my-zone> end
• (Sparse Root Zone Only) Add a shared file system that is loopback-mounted from the global zone.
Do not perform this step to create a whole root zone, which does not have any shared file systems. See the discussion for whole root zones in Disk Space Requirements.
zonecfg:my-zone> add inherit-pkg-dir
a. Specify that /opt/sfw in the global zone is to be mounted in read-only mode in the zone being configured.
zonecfg:my-zone:inherit-pkg-dir> set dir=/opt/sfw
b. ________________________________________
c. Note –
d. The zone's packaging database is updated to reflect the packages. These resources cannot be modified or removed after the zone has been installed using zoneadm.
e. End the inherit-pkg-dir specification.
zonecfg:my-zone:inherit-pkg-dir> end
This step can be performed more than once to add more than one shared file system.
________________________________________
Note –
If you want to create a whole root zone but default shared file systems resources have been added by using inherit-pkg-dir, you must remove these default inherit-pkg-dir resources using zonecfg before you install the zone:
• zonecfg:my-zone> remove inherit-pkg-dir dir=/lib
• zonecfg:my-zone> remove inherit-pkg-dir dir=/platform
• zonecfg:my-zone> remove inherit-pkg-dir dir=/sbin
• zonecfg:my-zone> remove inherit-pkg-dir dir=/usr
________________________________________
• (Optional) If you are creating an exclusive-IP zone, set the ip-type.
zonecfg:my-zone> set ip-type=exclusive
________________________________________
Note –
Only the physical device type will be specified in the add net step.
________________________________________
• Add a network interface.
zonecfg:my-zone> add net
a. (shared-IP only) Set the IP address for the network interface, 192.168.0.1 in this procedure.
zonecfg:my-zone:net> set address=192.168.0.1
b. Set the physical device type for the network interface, the hme device in this procedure.
zonecfg:my-zone:net> set physical=hme0
c. End the specification.
zonecfg:my-zone:net> end
This step can be performed more than once to add more than one network interface.
• Add a device.
zonecfg:my-zone> add device
a. Set the device match, /dev/sound/* in this procedure.
zonecfg:my-zone:device> set match=/dev/sound/*
b. End the device specification.
zonecfg:my-zone:device> end
This step can be performed more than once to add more than one device.
• Add a zone-wide resource control by using the property name.
zonecfg:my-zone> set max-sem-ids=10485200
This step can be performed more than once to add more than one resource control.
• Add a comment by using the attr resource type.
zonecfg:my-zone> add attr
a. Set the name to comment.
zonecfg:my-zone:attr> set name=comment
b. Set the type to string.
zonecfg:my-zone:attr> set type=string
c. Set the value to a comment that describes the zone.
zonecfg:my-zone:attr> set value="This is my work zone."
d. End the attr resource type specification.
zonecfg:my-zone:attr> end
• Verify the zone configuration for the zone.
zonecfg:my-zone> verify
• Commit the zone configuration for the zone.
zonecfg:my-zone> commit
• Exit the zonecfg command.
zonecfg:my-zone> exit
Note that even if you did not explicitly type commit at the prompt, a commit is automatically attempted when you type exit or an EOF occurs.
Subscribe with a valid E-mail id so that you can get the latest updates posted in this site in your e-mails.
Solaris Zones configuration and set up
Solaris Zones
Features :-
1.Virtualization like VMware
2.Solaris Zones can hosts only instances of solaris. Not other Os's
3.Limit of 8192 Zones per solaris Host
4.Primary Zone(Global) has access to all zones
5.non-global zones, do not have access to other non-global zones
6.Default non global zones derive oackages from global Zone
7.Program Isolation like zone1 for apache zone2 for mysql zone3 for databases.
8.Provides 'Z' commands to manage Zones : Zlogin zonecfg zoneadm zonename
Features of Global Zone
1.Solaris Always boots(cold/warm) to the global zone.
2.Knows about All Hardware devices attach to system
3.Knows about all non global Zones
Features of Non-Global Zones.
1.Installed at a location on the filesystem of the Global Zone
'Zone root path' /export/home/zones/zones1 {Zone2,Zone3----} this is as root directory for this zones.
2.Share Packages with Global Zone.
3.Manage distinct hostname and table files.
4.cannot communicate with other non-global zones by default.NIC must be used, which means use standard network API(TCP)
5.Global Zone admin can delegatenon-global zone administration
Zones Commands example :-
#which zonename - to check if you os has zonename commands
/usr/bin/zonename
#zonename - by default will show global zonename.
global
#z - "z' commands
Zone Configuration.
#zonecfg - to configure zones
note - zonecfg can run interactively , non -interactively, command-file modes
Requirements for non-global zones;
1.Hostname of
2.Zone root path ie /export/home/zones/testzone1
3.IP Adress - bound to logical or physical interfaces.
Zones Types:-
1.sparse Root Zones - share key fileswith global zones.
2.Whole Root Zones - require more storage
#df -k and select a slice which has more space lets example /export/home has 5GB
Steps for Configuring non-global-zone:
1.mkdir /export/home/zones/testzone1
2.chmod 700 /export/home/zones/testzone1 - for user restriction of global zone users.
3.ls -ltr /export/homes/zones
4#zonecfg -z testzone1
no such zone configured create one This error will pop when you first create a zone
>create - to create a zone
>set zonepath=/export/home/zones/testzone1 - This is the Root path for zone
>add net
>set address=192.168.1.0 - ip address
>set physocal=el000g0 - physical name of network card check with 'ifconfig -a'
> - If you are ready with you parameters press end before you can exit
>info- to see what we have set
>set autoboot=true - test zone will started automatically when system start
>info
>add attr - to add some extra parameters
attr>set name=commnet
attr>set type=string
attr>value =TestZone1
>end
>verify - verify if any error check the parameter again.
>commit - commit changes
>exit.
#list -iv - to list zones
#zoneadmin -z testzone1 install
Zone testzone1 in to installed in not ready for production so we have to get it in ready state now
#zoneadm list -iv - still u can see testzone1 has not got any id assigned like global one so now
#zoneadm -z testzone1 boot - boots the zone , changing its state from installed to ready
Simple is we are restarting the Testzone1
#zoneadm list -iv - now you can see an id is assigned and status is running.
#ps -ef | grep z
zoneadmd -z testzone1 - this process is responsible for this zone to run.
zlogin - is used to login to zones
Note - each non - global maintain a console, use 'zlogin -C testzone1' to acces that zone.
Note - zlogin permits login to non - global zone via the following messages
1.Interactive - i.e zlogin -l username zonename
2.Non -Interactive - zlogin options command
3.Console Mode - zlogin -C zonename
4.Safe Mode - zlogin -S
#zoneadm list -iv
#zlogin -C testzone1
select a laguage - 0 English
Vt100 - terminal
testzone1 press F2
Configure Kerbose - yes
name service - nis
Enter from this procure its same like installation of solaris so specify all details as required.
like dns names, nis services location places etc etc
#enter with root user and passwd
#zonename
testzone1
#zoneadm list -iv - shows all zones global and non - global
# once u r in testzone1 check /etc/passwd file u can see the system user but not users of the main system
#netstat -anp tcp
#Zoneadm -z testzone1 reboot - reboots the zone
#zlogin testzone1 shutdown - to shutdown the zone
Once Zones are created you can ssh or telnet from remote machine to connect that zone
Subscribe with a valid E-mail id so that you can get the latest updates posted in this site in your e-mails.
Tuesday, July 21, 2009
Flash configuration and Administration
Flash
# flarcreate –n flash_archive –R / -C –x /flash /flash/flash_archive
flash_archive -- Any name can be given
-R -- To mention root path
-C -- To compress the archive file
-x -- To exclude folders while creating archive image
-t -- Create an archive on a tape device
Administering a Flash Archive
flare –i archive -- Retrievs info about the archive
flare –c archive -- Combines the individual sections that make up an existing archive into a
new archive
flare –s archive -- Splits an archive into one file for each sections of the archive
/etc/ethers -- Mac address and hostname
/etc/hosts -- IP Address and hostname
# cd /export/config
# vi rules -- Same as Jumpstart content
# vi host_class -- Same as Jumpstart content except few options
install_type flashinstall
archive_location nfs 140.40.40.160:/flash/flash_archive
partitioning
….
….
…
# vi finish_script -- Same as Jumpstart content
# vi sysidcfg -- Same as Jumpstart content
# ./check -- To check the config
# cd /export/home/sol_dump/solaris_9/Tools
# ./add_install_client –c 140.40.40.160:/export/config –p 140.40.40.160:/export/config ultra5(hostname) sun4u
NFS Shares -- /flash folder
/export/config folder
Subscribe with a valid E-mail id so that you can get the latest updates posted in this site in your e-mails.
Configuring NIS for Jumpstart Procedures
Configuring NIS to support jumpstart procedures involves editing files and running commands on the NIS master server in use. Info supplied in the sysidcfg file overrides any information you make available in NIS.
A change to any file that is represented by a map in an NIS domain requires that you complete the following steps on the NIS master server
# vi /etc/inet/hosts
192.10.10.4 client1
# vi /etc/ethers
8:0:20:88:5b client1
# vi locale
client1 en_US
# cd /var/yp
# vi Makefile
1. Add the text after the existing *.time entries. Duplicate the timezone entry, and replace timezone with locale
Add/Append the word locale to the line beginning with the word all
Add the following line after the auto.home: autohometime entry
Locale: locale.time
Save the file and exit the editor
# cd /var/yp
# /usr/ccs/bin/make
2. On any slave servers that exist in the NIS domain, run the ypxfr command to transfer the locale.byname map for the first time.
# /usr/bin/netsvc/yp/ypxfr locale.byname
3. On the NIS master server, again update the NIS maps by running the make command
# cd /var/yp
# /usr/ccs/bin/make
# vi /etc/timezone
US/Mountain client1
US/Mountain Central.sun.com
# cd /var/yp
# /usr/ccs/bin/make
# /vi /etc/netmasks
192.9.200.0 255.255.255.0
# cd /var/yp
# /usr/ccs/bin/make
-- Each time you run the add_install_client script on a boot server to provide boot support for a jumpstart client, the script checks the /etc/nsswitch.conf file for the bootparams entry.
Begin Script
Profile
Finish Script
-- Use can use CD/DVD soruces as boot source instead of spooled Solaris OE Image. Also you can use a Flash source as an alternative installation service.
Identifying Log Files
Jumpstart clients retain the following log files during the installation process:
/tmp/begin.log
/tmp/finish.log
/tmp/install_log
/var/sadm/system/logs/sysidtool.log
Jumpstart clients retain a corresponding set of log files after the installation process completes and the system reboots
/var/sadm/system/logs/begin.log
/var/sadm/system/logs/finish.log
/var/sadm/system/logs/install_log
/var/sadm/system/logs/sysidtool.log
Subscribe with a valid E-mail id so that you can get the latest updates posted in this site in your e-mails.
Jump start and Boot Only Server
JumpStart
Four Main Services
Boot Services
Identification Services
Configuration Services
Installation Services
Implementing a Basic Jumpstart Server
1. Spool the OS image
2. Edit the sysidcfg file
3. Edit the rules and profile files
4. Run the check script
5. Run the add_install_client scripts
6. Boot the client
# cd /export
# mkdir config
# mkdir sol_dump
# cd /cdrom/cdrom0/s0/Solaris_9/Misc/Jumpstart_sample/
# cp –r * /export/config/
# cd /cdrom/cdrom0/s0/Solaris_8/Tools
# ./setup_install_server /export/home/sol_dump -- Copying solaris dump to local directory
# cd /cdrom/cdrom0/Solaris_9/Tools/
# ./add_to_install_server /export/home/sol_dump -- Appending 2nd CD content
# cd /etc
# vi ethers
8:0:20:a6:aa:2b ultra5 (hostname)
# vi /etc/hosts
140.40.40.154 ultra5
# vi /etc/timezone
Asia/Calcutta ultra5
# cd /export/config/
# vi rules
hostname ultra5 - host_class finish_script
- Pre Install script
host_class -- Config details like partition
finish_script -- Post install scripts
# vi host_class
install_type initial_install
system_type standalone
partitioning explicit
Cluster SUNWXall
filesys c0t0d0s0 10000 /
filesys c0t0d0s1 550 swap
filesys c0t0d0s7 free /export/home
# vi finish_script
touch /a/noaushutdown
rm /a/etc/defaultdomain
rm –r /a/var/yp/digit.com
cp /a/etc/nsswitch.files /a/etc/nsswitch.conf
# vi sysidcfg -- System identification & configuration. Timezone can also be given here
security_policy=none
name_service=none
network_interface=primary [netmask=255.255.0.0 protocol_ipv6=no]
timezone= Asia/Calcutta
system_locale=en_US
-- Time zone are listed in the directory structure below the /usr/share/lib/zoneinfo directory.
-- Locales are listed in the /usr/lib/locale directory
# chmod 755 finish_script
# ./check -- To check the config
# vi /etc/dfs/dfstab
share –o anon=0 /export/home/sol_dump
share –o anon=o /export/config
# cd /var/yp
# /usr/ccs/bin/Make
# cd /export/home/sol_dump/solaris_9/Tools
# ./add_install_client –c 140.40.40.151:/export/config –p 140.40.40.151:/export/config ultra5(hostname) sun4u
# update the NIS file with make command
From Client
ok boot net –install -- Will search the network and start the installation automatically
-- Before a Jumpstart client can boot and obtain all of the NFS resourctes it requires, every directory listed as an argument to the add_install_client script must be shared by the server on which it resides.
Setting Up a Boot-Only Server
A boot server responds to RARP, TFTP, and bootparams requests from jumpstart clients and provides a boot image using the NFS service.
1. Running the setup_install_server script with the –b option to spool a boot image from CD-Rom or DVD
2. Running the add_install_client script with options and argument that shows a list of servers and the identification config, and installation services that they provide.
Executing the setup_install_server script
# mkdir /export/install
# cd /cdrom/cdrom0/s0/Solaris_9/Tools
# ./setup_install_server –b /export/install
Executing the add_install_client script
Before you run the script, update the hosts and ethers information for the jumpstart client
/etc/inet/hosts
192.10.10.4 client1
/etc/ethers
8:0:20:9c:88:5b client1
The boot server must have entry in /etc/inet/hosts file for each server you specify while you run add_install_client script.
# cd /export/install/Solaris_9/Tools
# ./add_install_client –c server1:/export/config –p server1:/export/config client1 sun4u
Subscribe with a valid E-mail id so that you can get the latest updates posted in this site in your e-mails.
NIS Client and Slave Configuration
NIS Client Config
# domainname digit.com
# domainname > /etc/defaultdomain
# vi /etc/hosts
140.40.40.151 Solaris
# cp /etc/nsswitch.nis /etc/nsswitch.conf
# ypnit –c
Give master server name Solaris
# /usr/lib/netsvc/yp/ypstart
rpcbind done – client has only ypbind daemon
Slave server has ypserve & ypbind daemon
NIS Slave Config
# ypinit –s Solaris (Master Server)
Subscribe with a valid E-mail id so that you can get the latest updates posted in this site in your e-mails.
AufoFS Configuration
Autofs Config
# vi /etc/auto_master
comment +auto_master to search in WW
/home auto_home -nobrowse
/ auto_direct -
# vi /etc/auto_direct
/usr/share/man 140.40.40.151:/usr/share/man.orig
# vi /etc/auto_home
comment +auto_home
chennai1 140.40.40.151:/export/home/chennai1
chennai2 140.40.40.151:/export/home/chennai2
# automount –v
# cd /var/yp
# /usr/ccs/bin/make -- To update the map after any config change
Include auto direct in Makefile in 2, 3, & 4 section
# /usr/lib/netsvc/yp/ypstop
#/usr/lib/netsvc/yp/ypstart
NFS Configuration
NFS Config
# vi /etc/dfs/dfstab
share /export/home
share /usr/man.orig
# /etc/init.d/nfs.server stop
# /etc/init.d/nfs.server start
# useradd –d /export/home/Chennai1 –m Chennai1
# useradd –d /export/home/Chennai2 –m chennai2
# passwd chennai1
# passwd Chennai2
Remove the /export in the /etc/passed file for user chennai1 & chennai2. So the home dir is /home/chennai1
NIS Master Server Configurations
NIS Master Server Config
NIS maps are located in /var/yp/domainname directory(where domainname is the name of the NIS domain). There are two files (.pag and .dir files) for each map in this directory. Eg.
/var/yp/training/hosts.byname.pag file
/var/yp/training/hosts.byname.dir file
/var/yp/training/hosts.byaddr.pag file
/var/yp/training/hosts.byaddr.dir file
The syntax for the NIS map is map.key.pag and map.key.dir
Ypcat [-k] mname -- To retrieve values from NIS name service map, mname can be either a
map name or a map nickname
# ypcat hosts
localhost 127.0.0.1 localhost
sysprint 192.168.30.70 sysprint
sys44 192.168.30.44 sys44 loghost
ypmatch [-k] value mname -- Prints values associated with one or more keys from the NIS
name services map specified by the mname argument.
# ypmatch sys44 hosts
sys44: 192.168.30.44 sys44 loghost
# ypmatch usera passwd
usera: usera:LojyTdiQev5i:3001:10::/export/home/usera:/bin/ksh
NIS Domain Contains
One NIS Master Server
NIS Slave Servers (Optional)
NIS Clients
The NIS Master Server
Contains the original /etc/ASCII files used to build the NIS maps
Contains the NIS maps generated from the ASCII files
Provides a single point-of control for the entire NIS domain
NIS Slave Servers
Do not contain the original /etc/ASCII files
Contains copied of the NIS maps copied from the NIS Master Server
Provides a a backup repository for NIS map information
Provides redundancy in case of server failure
Provides load sharing on large networks
NIS Clients
Do not contain original /etc/ASCII files
Do not contain any NIS maps
Bind to the master server or to a Slave Server to obtain access to the administrative file information contained in that server’s NIS maps
Dynamically rebind to another server in case of server failure
Make all appropriate system calls aware of NIS
NIS Processes
The main daemons involved in the running of an NIS domain are
The ypserv daemon -- Responds to client information requests
The ypbind daemon -- Client to server binding
The rpc.yppasswd daemon -- Password change update in master server
The ypxfrd daemon -- Push the map to slave servers (sync)
The rpc.ypupdated domain -- Update NIS maps using the config stored in /var/yp/updates
The NIS Slave Server contains upserv and ypbind daemon
The NIS Clients contains only ypbind daemon
The three most common search orders are
Search files and then NIS
Search NIS and then files
Forward hosts lookup requests from NIS to DNS
Introducing NIS Security
The /var/yp/securenets file to restrict access to a single host or to a subnetwork, and using the passwd.adjunct file to limit access to the password information across the network.
The /var/yp/securenets File
If exist on an NIS server, the server only answers queries or supplies maps to hosts and networks whose IP Address exist in the file. The server must be part of the subnet to access itself.
# cat /var/yp/securenets
# Two methods of giving access to a system. Using the netmask followed by the IP Address
# or host keyword followed by the IP Address
host 127.0.0.1
255.255.255.0 150.10.1.0
host 13.13.14.1
host 13.13.14.2
If you modify entries in the /var/yp/securenets file. You must kill and restart the ypserv and ypxfrd daemons.
# /usr/lib/netsvc/yp/ypstop (or) ypstart
The passwd.adjunct File
Encrypted password are normally hidden from the user in the /etc/shadow file. With the default NIS configuration, however the encrypted password string is shown as part of passwd maps. This file prevents unauthorized users from seeing the encrypted passwords.
# ypmatch –k usera passwd
usera: usera:LojyTdiQev512:3001:10:/export/home/usera:/bin/ksh
The passwd.adjunct file contains the account name preceded by ## in the password field. Subsequent attempts to gain account ino, using the ypcat or ypmatch commands, returnds the password entry from the passwd adjunct file.
# ypmatch –k usera passwd
usera: usera:##usera:3001:10:/export/home/usera:/bin/ksh
Configuring NIS Domain
To locate the source file in another directory, modify the /var/yp/Makefile file:
Change the DIR=/etc line to DIR=Your choice
Change the PWDIR=/etc line to PWDIR=/your-choice
Before you make any modification to the /var/yp/Makefile, save a copy of the original Makefile file.
The NIS configuration script /usr/sbin/ypinit and the make utility generate NIS maps. The ypinit command reads the Makefile for source file locations, and converts ASCII scource files into NIS maps.The /etc/defaultdomain file sets the NIS domain name during system boot.
Important files on the NIS Master (Part 1) -- hosts, passwd & shadow
Important files on the NIS Master (Part 2)
The /var/yp/domainname directory is the repository for the NIS maps created by the ypinit script.
The /var/yp/binding/domainname directory contains the ypservers file where the names of NIS Master server and NIS Slave server are stored.
Important files on the NIS Master (Part 3) -- The /usr/netsvc/yp directory contains the ypstop and ypstart commands that stop and start NIS services respectively
# /usr/sbin/ypinit –m -- This command prompts for a list of other machies to become NIS
slave servers.
Configuring the NIS Master Server
Core, End User or Developer software configuration cluster do not have all necessary files in the /usr/lib/netsvc/yp directory to allow a host to function as an NIS server.
1. Copy the /etc/nsswitch.nis file to the /etc/nsswitch.conf file. If necessary, modify the file
2. Enter the domainname command to set the local NIS domain
# domainname classroom.central.sun.com
3. Create an /etc/defaultdomain file with the domain name
4. If the files do not already exist, use the touch command to create zero-length files.
/etc/ethers, /etc/bootparams, /etc/locale, /etc/timezone, /etc/netgroup and /etc/netmasks.
These files are necessary for the creation of the complete set of NIS maps.
5. Install and update Makefile file in the /var/yp directory.
6. Create or populate the /etc/locale file, and make an entry for each domain on your network
using the following format
domainname locale eg. Classroom.central.sun.com en_us
7. Initialize the master server by using the local /etc files
# ypinit –m -- Provide slave server names and Ctrl+D to save the details. Press n for
“Terminate it on the first fatal error”
Note: If you have to restart the ypinit program, You are prompted to destroy the
/var/yp/domainname directory. Answer Y
8. # /usr/lib/netsvc/yp/ypstart
Testing the NIS Service
$ ypcat hosts -- Prints value from an NIS map
# ypmatch sys41 localhost hosts
192.168.30.41 sys41
127.0.0.1 localhost loghost
$ ypwhich -- To identify the master server
sys41
Configure the NIS Client
1. Copy the /etc/nsswitch.nis file to the /etc/nsswitch.conf file
2. Edit the /etc/inet/hosts file to ensure NIS master and slave servers have been defined.
3. # domainname domainname -- To set the local NIS domain
4. Create and populate the /etc/defaultdomain file with the domain name
5. # ypinit –c -- To initialize the system as an NIS client
6. Enter the names of the NIS Master and all Slave Servers
7. # /usr/lib/netsvc/yp/ypstart
8. # ypwhich –m -- To test the functionality
Configuring NIS Slave Server
Follow the client configuration steps and perform the below command
# ypinit –s master -- Command to initialize the system as an NIS slave server. Where master is the name of the NIS master. Start the service and test the functionality
Updating the NIS Map
1. Updates the text files in your source directory (typically /etc, unless it was changed in the Makefile file)
2. # cd /var/yp
3. # /usr/ccs/bin/make -- Refresh the NIS database maps using the make utility
Updating NIS Password Map
If the NIS master is running the rpc.yppasswdd daemon, any client system can update the NIS password map by using the yppasswd or passwd commands.
1. Run the rpc.yppasswdd daemon on the NIS master server
# /usr/lib/netsvc/yp/rpc.yppassed /$PWDIR/passwd –m passwd
Updating the NIS Slave Server Map
The following steps manually update the NIS timezone map on the master server and propagate all maps to the slave servers
1. Edit the source file on the NIS Master
# vi /etc/timezone
2. Remake and push the NIS maps to slave servers
# cd /var/yp; /usr/ccs/bin/make
3. If the push fails. Manually pull only the timezone map from the master server by
performing the below command in Slave server
# /usr/lib/netsvc/yp/ypxfr timezone.byname
# ypinit –s nis_master -- To pull all of the maps at once
Sometimes maps fail to propagate, and you must manually use the ypxfr command to retrieve new map information. You can use shell scripts to run cron jobs for automatic update. The Solaris OE provides several template scripts in the /usr/lib/netsvc/yp directory that you can use and modify to meet your local site requirement.
ypxfr_lperhour script -- To sync NIS Slave Servers passwd map
ypxfr_lperday script -- To sync NIS Slave Servers NIS maps for the group, protocols,
networks, services, and upservers keys.
Ypxfr_2perday script -- To sync NIS Slave servers nIS maps for the hosts, ethers, netfroups keys, and mail aliases.
Quick Reference
# domainname digit.com -- Create domain name
# domainname > /etc/defaultdomain -- Creating domainname file
# cp /etc/nsswitch.nis /etc/nsswitch.conf
# /var/yp/Makefie -- Config file
Makefile 4 parts
1 – Declaration
2 – Details of centralization
3 – Coding for mapping
4 – Declaration of original path
# cd /var/yp
# ypinit –m -- Initializing the master server
# ypinit –s -- Initializing the slave server
# ypinit –c -- Initializing the client
Ctrl+D -- To save the file
Is this correct? [y/n] y
Non fatal error [y/n] n
If there is any error follow the below procedure
# cd /etc
# touch ethers bootparams netgroup netmasks timezone
# cd /var/yp
# ypinit –m
# /usr/lib/netsvc/yp/ypstart -- To start the daemons
# ypwhich -- Shows the map server details
Solaris
# ypwhich –m -- Full details of map
A directory will be created with domain name
# cd /var/yp/digit.com -- Contains all config file with .pag & .dir extensions
# ypcat /filename>to read the file
# ypcat –k passwd -- With arguments print keys as well as values
# ypmatch –k root passwd
NIS maps are located in /var/yp/domainname directory(where domainname is the name of the NIS domain). There are two files (.pag and .dir files) for each map in this directory. Eg.
/var/yp/training/hosts.byname.pag file
/var/yp/training/hosts.byname.dir file
/var/yp/training/hosts.byaddr.pag file
/var/yp/training/hosts.byaddr.dir file
The syntax for the NIS map is map.key.pag and map.key.dir
Ypcat [-k] mname -- To retrieve values from NIS name service map, mname can be either a
map name or a map nickname
# ypcat hosts
localhost 127.0.0.1 localhost
sysprint 192.168.30.70 sysprint
sys44 192.168.30.44 sys44 loghost
ypmatch [-k] value mname -- Prints values associated with one or more keys from the NIS
name services map specified by the mname argument.
# ypmatch sys44 hosts
sys44: 192.168.30.44 sys44 loghost
# ypmatch usera passwd
usera: usera:LojyTdiQev5i:3001:10::/export/home/usera:/bin/ksh
NIS Domain Contains
One NIS Master Server
NIS Slave Servers (Optional)
NIS Clients
The NIS Master Server
Contains the original /etc/ASCII files used to build the NIS maps
Contains the NIS maps generated from the ASCII files
Provides a single point-of control for the entire NIS domain
NIS Slave Servers
Do not contain the original /etc/ASCII files
Contains copied of the NIS maps copied from the NIS Master Server
Provides a a backup repository for NIS map information
Provides redundancy in case of server failure
Provides load sharing on large networks
NIS Clients
Do not contain original /etc/ASCII files
Do not contain any NIS maps
Bind to the master server or to a Slave Server to obtain access to the administrative file information contained in that server’s NIS maps
Dynamically rebind to another server in case of server failure
Make all appropriate system calls aware of NIS
NIS Processes
The main daemons involved in the running of an NIS domain are
The ypserv daemon -- Responds to client information requests
The ypbind daemon -- Client to server binding
The rpc.yppasswd daemon -- Password change update in master server
The ypxfrd daemon -- Push the map to slave servers (sync)
The rpc.ypupdated domain -- Update NIS maps using the config stored in /var/yp/updates
The NIS Slave Server contains upserv and ypbind daemon
The NIS Clients contains only ypbind daemon
The three most common search orders are
Search files and then NIS
Search NIS and then files
Forward hosts lookup requests from NIS to DNS
Introducing NIS Security
The /var/yp/securenets file to restrict access to a single host or to a subnetwork, and using the passwd.adjunct file to limit access to the password information across the network.
The /var/yp/securenets File
If exist on an NIS server, the server only answers queries or supplies maps to hosts and networks whose IP Address exist in the file. The server must be part of the subnet to access itself.
# cat /var/yp/securenets
# Two methods of giving access to a system. Using the netmask followed by the IP Address
# or host keyword followed by the IP Address
host 127.0.0.1
255.255.255.0 150.10.1.0
host 13.13.14.1
host 13.13.14.2
If you modify entries in the /var/yp/securenets file. You must kill and restart the ypserv and ypxfrd daemons.
# /usr/lib/netsvc/yp/ypstop (or) ypstart
The passwd.adjunct File
Encrypted password are normally hidden from the user in the /etc/shadow file. With the default NIS configuration, however the encrypted password string is shown as part of passwd maps. This file prevents unauthorized users from seeing the encrypted passwords.
# ypmatch –k usera passwd
usera: usera:LojyTdiQev512:3001:10:/export/home/usera:/bin/ksh
The passwd.adjunct file contains the account name preceded by ## in the password field. Subsequent attempts to gain account ino, using the ypcat or ypmatch commands, returnds the password entry from the passwd adjunct file.
# ypmatch –k usera passwd
usera: usera:##usera:3001:10:/export/home/usera:/bin/ksh
Configuring NIS Domain
To locate the source file in another directory, modify the /var/yp/Makefile file:
Change the DIR=/etc line to DIR=Your choice
Change the PWDIR=/etc line to PWDIR=/your-choice
Before you make any modification to the /var/yp/Makefile, save a copy of the original Makefile file.
The NIS configuration script /usr/sbin/ypinit and the make utility generate NIS maps. The ypinit command reads the Makefile for source file locations, and converts ASCII scource files into NIS maps.The /etc/defaultdomain file sets the NIS domain name during system boot.
Important files on the NIS Master (Part 1) -- hosts, passwd & shadow
Important files on the NIS Master (Part 2)
The /var/yp/domainname directory is the repository for the NIS maps created by the ypinit script.
The /var/yp/binding/domainname directory contains the ypservers file where the names of NIS Master server and NIS Slave server are stored.
Important files on the NIS Master (Part 3) -- The /usr/netsvc/yp directory contains the ypstop and ypstart commands that stop and start NIS services respectively
# /usr/sbin/ypinit –m -- This command prompts for a list of other machies to become NIS
slave servers.
Configuring the NIS Master Server
Core, End User or Developer software configuration cluster do not have all necessary files in the /usr/lib/netsvc/yp directory to allow a host to function as an NIS server.
1. Copy the /etc/nsswitch.nis file to the /etc/nsswitch.conf file. If necessary, modify the file
2. Enter the domainname command to set the local NIS domain
# domainname classroom.central.sun.com
3. Create an /etc/defaultdomain file with the domain name
4. If the files do not already exist, use the touch command to create zero-length files.
/etc/ethers, /etc/bootparams, /etc/locale, /etc/timezone, /etc/netgroup and /etc/netmasks.
These files are necessary for the creation of the complete set of NIS maps.
5. Install and update Makefile file in the /var/yp directory.
6. Create or populate the /etc/locale file, and make an entry for each domain on your network
using the following format
domainname locale eg. Classroom.central.sun.com en_us
7. Initialize the master server by using the local /etc files
# ypinit –m -- Provide slave server names and Ctrl+D to save the details. Press n for
“Terminate it on the first fatal error”
Note: If you have to restart the ypinit program, You are prompted to destroy the
/var/yp/domainname directory. Answer Y
8. # /usr/lib/netsvc/yp/ypstart
Testing the NIS Service
$ ypcat hosts -- Prints value from an NIS map
# ypmatch sys41 localhost hosts
192.168.30.41 sys41
127.0.0.1 localhost loghost
$ ypwhich -- To identify the master server
sys41
Configure the NIS Client
1. Copy the /etc/nsswitch.nis file to the /etc/nsswitch.conf file
2. Edit the /etc/inet/hosts file to ensure NIS master and slave servers have been defined.
3. # domainname domainname -- To set the local NIS domain
4. Create and populate the /etc/defaultdomain file with the domain name
5. # ypinit –c -- To initialize the system as an NIS client
6. Enter the names of the NIS Master and all Slave Servers
7. # /usr/lib/netsvc/yp/ypstart
8. # ypwhich –m -- To test the functionality
Configuring NIS Slave Server
Follow the client configuration steps and perform the below command
# ypinit –s master -- Command to initialize the system as an NIS slave server. Where master is the name of the NIS master. Start the service and test the functionality
Updating the NIS Map
1. Updates the text files in your source directory (typically /etc, unless it was changed in the Makefile file)
2. # cd /var/yp
3. # /usr/ccs/bin/make -- Refresh the NIS database maps using the make utility
Updating NIS Password Map
If the NIS master is running the rpc.yppasswdd daemon, any client system can update the NIS password map by using the yppasswd or passwd commands.
1. Run the rpc.yppasswdd daemon on the NIS master server
# /usr/lib/netsvc/yp/rpc.yppassed /$PWDIR/passwd –m passwd
Updating the NIS Slave Server Map
The following steps manually update the NIS timezone map on the master server and propagate all maps to the slave servers
1. Edit the source file on the NIS Master
# vi /etc/timezone
2. Remake and push the NIS maps to slave servers
# cd /var/yp; /usr/ccs/bin/make
3. If the push fails. Manually pull only the timezone map from the master server by
performing the below command in Slave server
# /usr/lib/netsvc/yp/ypxfr timezone.byname
# ypinit –s nis_master -- To pull all of the maps at once
Sometimes maps fail to propagate, and you must manually use the ypxfr command to retrieve new map information. You can use shell scripts to run cron jobs for automatic update. The Solaris OE provides several template scripts in the /usr/lib/netsvc/yp directory that you can use and modify to meet your local site requirement.
ypxfr_lperhour script -- To sync NIS Slave Servers passwd map
ypxfr_lperday script -- To sync NIS Slave Servers NIS maps for the group, protocols,
networks, services, and upservers keys.
Ypxfr_2perday script -- To sync NIS Slave servers nIS maps for the hosts, ethers, netfroups keys, and mail aliases.
Quick Reference
# domainname digit.com -- Create domain name
# domainname > /etc/defaultdomain -- Creating domainname file
# cp /etc/nsswitch.nis /etc/nsswitch.conf
# /var/yp/Makefie -- Config file
Makefile 4 parts
1 – Declaration
2 – Details of centralization
3 – Coding for mapping
4 – Declaration of original path
# cd /var/yp
# ypinit –m -- Initializing the master server
# ypinit –s -- Initializing the slave server
# ypinit –c -- Initializing the client
Ctrl+D -- To save the file
Is this correct? [y/n] y
Non fatal error [y/n] n
If there is any error follow the below procedure
# cd /etc
# touch ethers bootparams netgroup netmasks timezone
# cd /var/yp
# ypinit –m
# /usr/lib/netsvc/yp/ypstart -- To start the daemons
# ypwhich -- Shows the map server details
Solaris
# ypwhich –m -- Full details of map
A directory will be created with domain name
# cd /var/yp/digit.com -- Contains all config file with .pag & .dir extensions
# ypcat
# ypcat –k passwd -- With arguments print keys as well as values
# ypmatch –k root passwd

Configuring Name Service Clients
Configuring a DNS Client
The client resolver code is controlled by the following files
/etc/resolv.conf -- Contains directive to specify the scope of a query
/etc/nsswitch.conf -- Contains the reference to DNS for the hosts entry
Configuring the DNS Client During Installation
-- Select DNS -- Give Domain Name -- Enter IP Address -- Enter search Domains -- Confirm
Editing DNS Client Configuration Files
# vi /etc/resolv.conf
domain digigeeks.com
nameserver 140.40.40.152
search digigeeks.com -- List the local domain as the first argument to the search
Copying the /etc/nsswitch.dns File to the /etc/nsswitch.conf
# cp /etc/nsswitch.dns /etc/nsswitch.conf
# cat /etc/nsswitch.conf
………
hosts files dns
……..
If you want to add DNS name resolution to a system currently running a name service, such as NIS or NIS+. You must place the dns keyword on the hosts line in the specific location, along with other keywords.
# cat /etc/nsswitch.conf
…..
hosts: nfs files dns
…..
Setting up an LDAP Client
The LDAP server cannot be a client of itself. Getting this configuration to work properly requires changes to the LDAP server and the LDAP client. The ldap_cachemgr daemon is responsible for maintaining and updating the changes to the client profile information.
Configuring LDAP Client During Installation
-- Select LDAP -- Enter Domain Name -- Enter Profile Name & Profile Server IP Address -- Confirm
Initializing the Native LDAP Client
You execute the ldapclient command on the client system once to initiate the client as a native LDAP client. The ldapclient command creates two files in the ./var/ldap directory on the LDAP client. These files contain info that the LDAP client use when binding to and accessing LDAP data.
/var/ldap/ldap_client_cred -- The proxy agent info that the client uses for LDAP authentication
/var/ldap/ldap_client_file -- The config info from the client profile in the LDAP server DB
# ldapclient init –a proxy password=proxy –a proxy DN=cn=proxyagent, ou=profile, dc=suned.com, dc=sun –a domainname=suned.com 192.168.0.100
# ldapclient list
Copying the /etc/nsswitch.ldap to the /etc/nsswitch.conf
During LDAP client initialization the /etc/nsswitch.ldap file is copied over the /etc/nsswitch.conf file
# ldaplist -- To list naming info from LDAP server
# ldapclient uninit -- Unconfiguring LDAP Client
Using Name Services
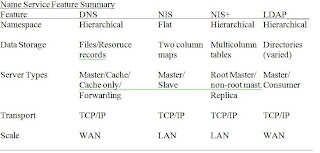
Name Services -- DNS, NIS, NIS+, LDAP
/etc/rc2.d/S72inetsvc script -- Starts DNS during system boot.
/etc/rc2.d/S71rpc script -- Starts NIS & NIS+ during system boot
/etc/rc2.d/S72directory script -- Starts iPlanet Server during system boot.
The name service switch file determines which services a system users to search for information and in which order the name services are searched. All Solaris OE systems uses the /etc/nsswitch.conf file as the name service switch file. The nsswitch.conf is loaded with the contents of a template file during the installation of the Solaris OE depending on the name service that is selected.
Name Service Name Service Template
Local Files /etc/nsswitch.files
DNS /etc/nsswitch.dns
NIS /etc/nsswitch.nis
NIS+ /etc/nsswitch.nisplus
LDAP /etc/nsswitch.ldap
Configuring the Name Service Cache Daemo (nscd)
The nscd daemon is a process that provides a cache for the most common name service requests. The /etc/nscd.conf file controls the behavior of the nscd daemon. The nscd daemon provides caching for passwd, group, hosts, ipnodes, exec_attr, prof_attr and user_attr databases. Each line specifies either an attribute and a value or an attribute, a cache name, and a value.
# /etc/init.d.nscd stop (or) start
The getent command provides generic retrieval interface to search many name service database. As a system administrator, you can query name service information sources with tools, such as the
ypcat NIS namespace
nslookup DNS
ldaplist LDAP
Bt these tools are not consulting nsswitch.conf file. Whereas getent command searches the information sources in the order in which they are configured in the name service switch file. So if there is any error in the file will be identified with this command.
getent database [key]…..
database -- The name of the database to be examined. This name can be passwd, group, hosts, ipnodes, services, protocols, ethers, networkds, or netmasks.
# getent passwd lp
lp:x:71:8:Line Printer Admin:/usr/spool/lp:
# getent group 10
staff::10:
# getent hosts sys44
192.168.38.44 sys44 loghost (loghost will be absent if the NIS is searched first)
Configuring System Messaging
The syslog system messaging features track system activities and events. You can manually generate log messages by using the logger command. The syslog function, the syslogd daemon, and input from the /etc/syslog.conf file work together to facilitate system messaging for the solaris 9 OE.
The /etc/syslog.conf file
This file consists of two tab-separated fields: selector and action. The selector field has two components, a facility and a level written as facility.level. Facility represent categories of system processes that can generate messages. Levels represent the severity or importance of the message. The action field determines whether to send the message.
*.err /var/adm/messages -- Error messages for all facilities are sent to the /var/adm/messages
Only use tabs as white space in the .etc.syslog.conf file. The Solaris OE accesses the /usr/include/sys/syslog.h file to determine the correct facility.level sequencing order.
Selector Fields (facility) Options
kern Messages generated by the kernel
user Messages generated by user processes and don’t have default priority for messages
daemon System daemon, such as the in.ftpd and the telnetd daemon
auth The authorization system, including the login, su, and ttymon commands
syslog Messages generated internally by the syslogd daemon
lpr The line printer spooling system, such as the lpr and lpc commands
news Files reserved for the USENET network news system
uucp The UNIX to UNIX copy (uucp) system does not use the syslog function
cron The cron and at facilities, including crontab, at, and cron
local0-7 Fields reserved for local use.
mark The time when the message was last saved and produced by the syslogd daemon
* All facilities, except the mark facility.
You can use the asterisk (*) to select all facilities (for eg. *.err); however, you cannot use * to select all levels of a facility (for eg. Kern.*)
The levels in descending order of severity
Selector Fields (level) Options
Level Priority Description
emerg 0 Panic conditions that are normally broadcast to all users
alert 1 Conditions that should be corrected immediately
crit 2 Warnings about critical conditions, such as hard device errors
err 3 Errors other than hard device errors
warning4 Warning messages
notice 5 Non-error conditions that might require special handling
info 6 Informational messages
debug 7 Messages that are normally used only when debugging a program
none 8 Messages are not sent from the indicated facility to the selected file
Not all levels of severity are implemented for all facilities in the same way.
Action Field -- The action field defines where to forward the message. This field can have any one of the following entries
/filename The targeted file
@host The @sign denoted that messages must be forwarded to a remote host.
Messages are forwarded to the syslogd daemon on the remote host
user1, user2 The user1 and user2 entries receive messages if they are logged in
* All logged in users will receive messages
You must restart the syslogd daemon whenever you make any changes to /etc/syslog.conf file
# /etc/init.d/syslog stop (or) start
# pkill –HUP syslogd
Syslogd started -- It’s starting the M4 Macro Processor -- M4 will read the /etc/syslog.conf file.
Configuring syslog Messaging
The inetd daemon uses the syslog command to record incoming network connection requests made by using TCP. You can modify the behavior of the inetd daemon to log TCP connections by using the syslogd daemon. The daemon facility and the notice message level are supported by inetd.
Use the –t option as an argument to the inetd daemon to enable tracing of TCP services. When you enable the trace option for the inetd daemon, it uses the daemon.notice to log the client’s IP address and TCP port number, and the name of the service. Add the –t option to the entry which activated the inetd daemon in the inetsvc script located in the /etc/init.d directory
# grep inetd /etc/init.d/inetsvc
/usr/sbin/inetd –s –t -- You must restart the inetd daemon for the new option to take effect
# grep daemon.notice /etc/syslog.conf
*.err;kern.debug;daemon.notice;mail.crit /var/adm/messages
Monitoring a syslog File in Real Time
The tail –f command holds the file open so that you can view messages being written to the file by the syslogd daemon.
# tail –f /var/adm/messages -- Press Ctrl+c to exit
Adding One-Line Entries to a System Log File
logger [-i](logs PID) [-f file] [-p priority] [-t tag] [message]
# logger system rebooted -- If the user.notice field is configured in the /etc/syslog.conf file, the message is logged to the file designated for the user.notice selector field
# logger –p user.err system rebooted -- Changing the priority of the messages to user.err route the messages to the /var/adm/messages file as indicated in the /etc/syslog.conf file
# logger –i –p2 “crit”
/dev/sysmsg -- Console
Performing Smartcard Authentication
# /usr/dt/bin/sdtsmartcardadmin & -- To start smartcard console
ATR – Answer to reset Number (unique)
# smartcard –c disable -- Disabling smartcard operation
# smartcard –c admin -- Display the current client and server configuration
# /etc/smartcard/opencard.properties -- Config File
# /usr/dt/bin/sdtsmartcardadmin & -- To start smartcard console
ATR – Answer to reset Number (unique)
# smartcard –c disable -- Disabling smartcard operation
# smartcard –c admin -- Display the current client and server configuration
# /etc/smartcard/opencard.properties -- Config File
Monday, July 13, 2009
RBAC (Role Based Access Control)
/etc/user_attr -- The extended user attributes database, which associates users and roles with
authorizations and right profiles in addition to the /etc/passwd, /etc/group,
and /etc/shadow files
/etc/security/prof_attr -- The rights profile attributes database, which defines profiles, lists
the profile’s assigned authorizations and any nested rights profiles,
and identifies the associated help files.
/etc/security/exec_attr -- The execution attributed database, which defines the privileged
commands and scripts assigned to a profile.
/etc/security/auth_attr -- The authorization attributes database, which defines authorizations
and their attributes. This database also identifies the associated
help file.
/etc/security/policy.conf -- File provides system default authorizations for users
The /etc/user_attr Database
user:qualifier(reserved):res1(reserved):res2(reserved):attr
attr : An optional list of semicolon separated (;) key value pairs that describe the security attributes to be applied when the user runs commands.
type -- Can be normal or role. A role is assumed after the user has logged in.
auths -- Specifies a list of authorization chosen from names defined in the auth_attr DB
profiles -- Specifies a list of profile names chosen from the /etc/security/prof_attr DB
roles -- Specifies a list of role names defined in the same /etc/user_attr DB. Roles are
indicated by setting the type value to role. Roles cannot be assigned to other roles.
sysadmin::::type=role;profiles=Device Management,Filesystem Management,Printer Management
johndoe::::type=normal;auth=solaris.system.date;roles=sysadmin
The /etc/security/prof_attr Database
profname:res1:res2:desc(description):attr
attr : The security attrinutes to apply to the object upon execution. You can specify zero or more key. The two valid keys are help and auths.
# grep ‘Printer Management’ /etc/security/prof_attr
Printer Management:::manage Printers, daemns, \
……………………;auths=solaris.admin.printer.read, \
The Printer Management profile, which is defined in the /etc/security/prof_attr DB, is assigned to the sysadmin role in the /etc/user_attr DB.
The Printer management profile is defined in the prof_attr DB as having all authorizations, beginning with the solaris.admin.printer.string, assigned to it. These authorizations are defined in the /etc/security/auth_attr DB.
solaris.admin.printer.read:::view printer information::\
The /etc/security/exec_attr Database
name:policy:type:res1:res2:id:attr
name -- Name of the profile
policy -- The security policy associated with this entry. The suser (superuser policy model)
is the only valid policy entry.
type -- The type of entity. Whose attributes are specified. The only valid type is cmd
id -- a string identifying the entity. Command should have full path or a path with wildcard
attr -- euid and uid | egid and gid
Printer Management:suser:cmd:::/usr/sbin/accept:euid=lp
The /etc/security/auth_attr Database
You can assign authorization directly to users or roles in the /etc/user_attr DB. You can also assign authorizations to rights profiles, which are assigned to roles.
authname:res1:res2:short_desc:long_desc:attr
authname -- A unique character string that identifies the authorization in the prefix.suffix[.] format.
The /etc/security/policy.conf file
This file lets you grant specific rights profiles and authorization to all users. Two types of entries in the file are
AUTHS_GRANTED=authorizations
PROFS_GRANTED=right_profiles
# cat policy.conf
AUTHS_GRANTED=solaris.device.cdrw
PROFS_GRANTED=Basic Solaris Users
# roleadd –m –d /export/home/tarback –m –c “Privileged tar backup role” –p “Media Backup, Media Restore” tarback
-A authorization and -p profile -- Assign authorization and profiles respectively to the role.
# rolemod –A auth1,auth2 –p profile1,profile2 role1
Additional Commands Used to Perform RBAC Functions
auths Displays authorizations for a user
makedbm Makes a dbm file
nscd Identifies the name service. Useful for caching the 4 RBAC DB details
pam_roles Identifies the role account management module for password authentication
module (PAM)
pfexec Identifies the profile shells used to execute commands with attributes specifies
in exec_attr
policy.conf Identifies the config file for the security policy. Lists granted authorization
profiles Displays profiles for a specified user
roles Displays roles granted to a user
roleadd Adds a role account to the system
rolemod Modifies the role’s account info in the system
roledel Deletes a role’s account from the system
Example
Profile -- Privilege to profile -- Creating Role -- Role to profile -- Role to user
/etc/security/prof_attr -- Contains profile details
Creating profile in prof_attr
uadd::Profile for user admin
init:::Profile for init process
/etc/security/exec_attr -- Privilege to profile
uadd:suser:cmd:::/usr/sbin/useradd:euid=0
uadd:suser:cmd:::/usr/sbin/usermod:euid-0
init:suser:cmd:::/usr/sbin/init:euid=0
init:suser:cmd:::/usr/sbin/shutdown:euid=0
Creating Role
# roleadd –d /export/home/role1 –m role1
# passwd role1
Role to Profile
# rolemod –P uadd,init role1
Adding role to user
# usermod –R role1 user1
/etc/user_attr -- Details about role & user to role
Login as normal user
Switch to role profile & use the privilege command
/etc/security/auth_attr -- Authorization file -- Config file for users & this roles
ACL - Access Control List
ACL
entry-type:[UID or GID]:perm
Introducing ACL Commands
getfacl [-a] [-d] filename(s) -- Displays ACL entries for files
-a -- Displays the filename, file owner, file group, and ACL entries for the specified file
-d -- Displays the filename, file owner, file group, and default ACL entries
setfacl –m acl_entries filename -- Creats or modify ACL entries on files
setfacl –s acl_entries filename -- Substitute new ACL entries for old ACL entries
setfacl –d acl_entries filename -- Deletes one or more ACL entries on files
setfacl –f acl_file filename -- Specifies an ACL configuration file that contain ACL entries
to set on other files
setfacl –r filename -- Recalculate the ACL mask baed on the ACL entries. When used with
–m or –s option
$ ls –l
_rw_r__r__+ 1 userc staf 0 Jan 2 13:40 file2 -- A plus sign appears for files
contains ACL permission
There are no effective permission listed for a file’s owner or “others’ users. However, the file’s group and any other specific users or groups present in the ACL list have effective permissions. When no ACL mask is specifically set o a file or directory, the ACL mask has the same permissions as the group permissions for that file or directory.
$ getfacl file1 -- No ACL entries present
file : file1
owner : userc
group : sysadmin
user::rw_
group::r__ # effective:r__
mask:r__
other:r__
$ getfacl file2 -- Custom ACLentry present
file : file2
owner : userc
group : sysadmin
user::rw_
user::usera:rwx # effective:r__
group::r__ # effective:r__
mask:r__
other:r__
The effective permission shows which permissions are allowed. When you compute the intersection (a Boolean logical AND operation) of the ACL entry and the ACL mask.
$ setfacl –m u:userb:7 file2 -- Set special permission to userb(username)
$ getfacl file2
file : file2
owner : userc
group : sysadmin
user::rw_
user::usera:rwx # effective:r__
user:userb:rwx # effective:r__
group::r__ # effective:r__
mask:r__
other:r__
$ setfacl –d u:usera file2 -- Removing special permissions
$ getfacl file2
file : file2
owner : userc
group : sysadmin
user::rw_
user:userb:rwx # effective:r__
group::r__ # effective:r__
mask:r__
other:r__
setfacl –s u::perm,g::perm,o:perm,m:perm,[u:UID:perm],[g:GID:perm] filename
$ setfacl –s u::rwx,g::rw_,o:r__,m:rw_,u:usera:rwx file1
$ getfacl file1
file : file1
owner : userc
group : sysadmin
user::rwx
user:usera:rwx # effective:rw_
group::rw_ # effective:rw_
mask:rw_
other:r__
$ setfacl –s u::7,g::6,0:4,m:6,u:usera:7 file2
$ setfacl –r –m u:usera:7 file1 -- Change the umask value as well as to the
user(Recalculating an ACL mask)
$ getfacl file1
file : file1
owner : userc
group : sysadmin
user::rwx
user:usera:rwx # effective:rwx
group::rw_
mask:rwx
other:r__
getfacl filename1 | setfacl –f – filename2
$ getfacl file1 | setfacl –f – file3 -- Copying an ACL List
You can set default ACL entries only on directories. You must set default ACL entries for the user, group, other, and ACL mask before you set a default ACL entry for an additional user of group.
$ pwd
/export/home/userc
$ mkdir dir1
drwxr_xr_x 2 userc sysadmin 512 Apr 29 17:11 dir1
$ getfacl dir1
# file:dir1
# owner:userc
# group:sysadmin
user::rwx
group::r_x # effective:r_x
mask:r_x
other:r_x
$ setfacl –m d:u::rwx,d:g::r_x,d:o:r_x,d:m:r_x dir1
$ setfacl –m default:user:usera:rwx dir1
$ getfacl dir1
# file:dir1
# owner:userc
# group:sysadmin
user::rwx
group::r_x # effective:r_x
mask:r_x
other:r_x
default:user:rwx
default:user:usera:rwx
default:group:r_x
default:mask:r_x
default:other:r_x
Effect of Default ACLs on New Subdirectories
When a directory contains a default ACL, the permissions granted to the user, group, and other categories for the directory represent the intersection of mode 777, which is the UNIX default for directories without umask influence.
When a subdirectory/file created, the permissions on the newly created subdirectory/file are generated according to the intersection between the default ACL entries and the permissions set initially during creation.
$ mkdir dir1/subdir1
$ ls –l dir1
drwxr_xr_x+ 2 userc sysadmin 512 Apr 30 08:01 subdir1
$ getfacl dir1/subdir1
# file:dir1/subdir1
# owner:userc
# group:sysadmin
user::rwx
group::r_x # effective:r_x
mask:r_x
other:r_x
default:user:rwx
default:user:usera:rwx
default:group:r_x
default:mask:r_x
default:other:r_x
If default ACL entries changed for the dir1 it won’t affect the ACL of dir1/subdir1. But if we create new subdirectory the new ACL of the dir1 will get inherited.
$ setfacl –m d:group::rwx,d:group::rws,d:other:rwx,d:mask:rwx dir1
$ mkdir dir1/subdir2
$ getfacl dir1/subdir2
user::rwx
group::rwx # effective:rwx
mask:rwx
other:rwx
default:user::rwx
default:user:usera:rwx
default:group::rwx
default:mask:rwx
default:other:rwx
$ cd dir1/subdir2
$ touch filea
$ ls –l
_rw_rw_rw_+ 1 userc sysadmin 0 Apr 30 13:34 filea
$ getfacl filea
user::rw_
user:usera:rwx # effective:rw_
group::rw_ # effective:rw_
mask:rw_
other:rw_
The permission granted to the user, group, and other categories for filea represents the intersection of mode 666(default for files without umask influence) with the default entries associated with the directory are set to rwx, the example of intersection is clear.
The mask value doesn’t exceed the permissions assigned to the group. Eventhough the /dir1/subdir2 directory lists rwx as the default mask value inherit only upto rw_. The entry for usera was applied as a standard ACL entry and not as a default entry, because only directory replicate default entries.
Solaris volume Mangement
metadb –a [-f] [-c n] [-l nnnn] disk_slice
-a Adds a stale database replica
-f Force the creation of the initial replica, even if no replica exist.
-c n Specifies the number of replicas to add to the slice
-l nnnn Specifies the size of the new replica in blocks
disk_slice Specifies the name of the disk_slice that will hold the replica
# metadb –a –f c0t0d0s4 c0t0d0s5 c1t0d0s0 c1t0d0s1 -- To create metadb
# metadb -- Reports the status of all replicas
RAID 0 Config
# metainit d10(name d0-dn) 3(total disk/slice) 1 c0t1d0s0 1 c0t1d0s1 1 c0t1d0s3
# newfs /dev/md/rdsk/d10
# metaclear d10 -- Delete the volume
# metainit d0(partition name) –p d10(volume name) 1000m -- Creating partition
# metattach d0 999m -- To increase partition size
# growfs –M /m1(mount point) /dev/md/rdsk/d0 -- To create FS for extra space added
# metattach d10(volume) c0t1d0s4 -- To increase space for volume
RAID 5 Config
# metainit d20 –r(raid 5 option) c0t1d0s0 c0t1d0s1 c0t1d0s3
# metadb –d –f c0t1d0s7 -- To delete metadb
RAID 1 Config
# metainit d10 –m d0 -- To create mirror
Then reboot
# metattach d10 d1 -- Attaching another disk to mirror
# metastat -- To check the status of mirror disk
Building a Mirror of the Root (/) File System
metainit –f concat/stripe numstipes width components……
# metainit –f d0 1 1 c0t0d0s0
d0 concat/stripe is setup
# metainit d1 1 1 c0t1d0s0
d1 concat/stripe is setup
metainit mirror –m submirror [read_options] [write_options] [pass_num]
read_options
-g -- Enables the geometric read option, which results in faster performance on sequential
reads
-r -- Directs all reads to th first submirror. Use this option, when the devices that comprise
the first submirror are substantially faster than those of the second mirror.
You cannot use –r option with the –g option. If neither the –g nor –r options are specified, reads are made in a round-robin order from all submirros in the mirror. This process enables load balancing across the submirros.
write_options
S -- Performs serial write to mirrors. The default setting for this option is parallel write
Pass_num -- A number (0-9) at the end of an entry defining a mirror that determines the order in which that mirror is resynchronized during a reboot. The default is 1. If 0 used resync is skipped.
# metainit d10 –m d0
d10 : Mirror is setup
# metaroot d10 -- Updates /etc/system file also /etc/vfstab
# grep md /etc/vfstab
/dev/md/dsk/d10 /dev/md/rdsk/d10 / ufs 1 no -
The metaroot command also updates the /etc/system file to contain the forceload statement that loads the kernel modules that support the logical volumes.
# tail /etc/system
forceload : misc/md_hotspares
forceload : misc/md_sp
forceload : misc/md_stripe
forceload : misc/md_mirro
forceload : drv/pcipsy
.
.
.
rootdev:/pseudo /md@0.10.blk
You must reboot the system before attaching the secondary submirror
# init 6
# metattach d10 d1
d10: Submirror d1 is attached
# ls –l /dev/dsk/c1t0d0s4
Record the path that follows the /devices directory: /pci@if,0/pci@1/scsi@4......................
ok nvalias backup_root /pci@if,0/pci@1/scsi@4,1/disk@2,0:b
ok printenv boot-device
boot-device=disk net
ok setenv boot-device disk backup_root net
boot-device=disk backup_root net
ok boot backup_root -- To test the secondary submirror
Unmirroring the Root (/) File System
# metastat d10 -- To verify that status of the mirror
# metadetach d10 d1 -- To make a one-way mirror
d10: submirror d1 is detached
# metaroot /de/dsk/c0t0d0s0 -- To change entries in /etc/vfstab and /etc/system
# init 6
# metaclear –r d10 -- To clear the mirror and submirror. The –r deletes metadevices
d10: Mirror is cleared
d0: Concat/Stripe is cleared
# metaclear d1
d1: Concat/Stripe is cleared
Configuring AutoFS
Configuring AutoFS
The automount facility contains three components
The AutoFS FS
The automountd daemon
The automount command
The AutoFs map types
Master Map The auto_master map associates a directory, also called a mount point, with a map.
Direct Map Lists the mount points as absolute path names. This map explicitly indicates
the mount point on the client.
Indirect Map Lists the mount points as relative path names. This map uses a relative path to
establish the mount point on the client.
Special Provides access to NFS servers by using their host names
# cat /etc/auto_master
+auto_master
/net -hosts -nosuid,nobrowse
/home auto_home -nobrowse
/xfn -xfn
Syntax
Mount point map name(direct or indirect map) mount options(similar to standard mount options. But nobrowse option is an AutoFS specific mount option
The plus(+) symbol at th beginning of the +auto_maser line directs the automountd daemon to look at the NIS, NIS+, or LDAP databases before it reads the rest of the map. If this line is commented out, only the local files are searched unless the /etc/nsswitch.conf file specifies that NIS, NIS+, or LDAP should be searched.
The two mount points for special maps are –hosts map & -xfn map
The –hosts map Provide access to all resources shared by NFS servers. The resources being shared by a server are mounted below the /net/hostname directory, or if only the server’s IP address is known below the /net/IPaddress directory. The server doesn’t have to be listed in the hosts database for this mechanism to work.
The –xfn map Provides access to resources acailable through the Federated Naming Service (FNS). Resources associated with FNS mount below the /xfn directory
Direct Map
# cat /etc/auto_master
.
.
/- auto_direct -ro
The /- mount point is a pointer that informs the automount facility that the full path names are defined in the file specified by map-name(the /etc/auto_direct file in this example)
# cat /etc/auto_direct
# Super User created direct map for automounter
/apps/frame -ro,soft server1:/export/framemaker
/opt/local -ro,soft server2:/export/unbundled
/usr/share/man -ro,soft server3,server4:/usr/share/man
Indirect Map
The /home entry defines a mount point for an indirect map. The map auto_home list relative path names only. The Solaris 2.6 through Solaris 9 OE support browsing of indirect maps and special maps with the –browse option. The –nobrowse option disables the browsing of indirect maps. The default option is –browse
# cat /etc/auto_home
+auto_home
steven hosts5:/export/home/steven
mary mars:/export/home/marry
Reducing the auto_home map to a single line
* server1:/export/home/&
The client remotely mont the /export/home/loginID directory from the NFS server server1 onto the local mount point /home/loginID. Wildcard character(*) to match any key. The substitution character (&) at the end of the location is replaced with the matched key field.
Run the automount command when making changes to the master map or creating a direct map to make the changes effective. You do not have to stop and restart the automountd daemon after making changes to existing entries in a direct map.
Automount [-t duration] [-v]
-t Specifies a time in seconds, the FS remains mounted when not in use. Default is 600 sec.
When to run the automount command
Automount Map Run if entry is added/deleted Run if entry is modified
Master map yes yes
Direct map yes no
Indirect map no no
# cat /etc/mnttab
-hosts /net autofs indirect,nosuid,ignore,nobrowse dev=4300001|1008255810
auto_home ………….
-xfn ………….
# /etc/init.d/autofs start (or) stop
Configuring NFS
Configuring NFS
NFS Server Files
/etc/dfs/dfstab Lists the local resources to share at boot time
/etc/dfs/sharetab Lists the local resources currently being shared.
/etc/dfs/fstypes Lists the default FS types for remote FS
/etc/rmtab Lists FS remotely mounted by NFS clients
/etc/nfs/nfslog.conf Lists info of the location of config logs used for NFS server logging
/etc/default/nfslogd Lists config info describing the behavior of the nfslogd daemon
# cat /etc/dfs/dfstab
share –F nfs –o ro /export.sys44_data
# cat /etc/dfs/sharetab
/export/sys44_data - nfs ro
# cat /etc/dfs/fstypes
nfs NFS Utilities
autofs AUTOFS Utilities
cachefs CACHEFS Utilities
# cat /etc/rmtab
sys42:/export/sys44-data
#sys41:/usr/share/man
#sys43:/export/sys44_data -- The # entries are removed by the mountd daemon during a
system startup
NFS Server Daemons
To start the NFS server daemons or to specify the number of concurrent NFS requests that can be handled by the nfsd daemon, use the /etc/rc3.d/S15nfs.server script
mountd Handles FS mount requests from remote systems, and provides access control
nfsd Handles client FS requests
statd Works with the lockd daemon to provide crash recovery functions for the lock
manager
lockd Supports record locking operations on NFS files
nfslogd Provides operational logging
# /etc/init.d/nfs.server start -- To start NFS server daemon
# /etc/init.d/nfs.server stop -- To stop NFS server daemon
NFS Server Commands
# share -- To share directory and also displays the contents of the /etc/dfs/sharetab file
# unshare /test -- Unshare the share
# shareall -- Shares all resources listed in the /etc/dfs/dfstab file
# unshareall /export/sys44_data -- Unshare currently shared file resources listed in the
/etc/dfs/sharetab file
# dfshares -- Displays currently shared resources by using the NFS dameon mountd
# dfshares 140.40.40.160 -- Lists available shared resources in remote system
# dfmounts -- Displays a list of NFS resources that are currently mounted and client list
# dfmounts sys42 -- Displays NFS resources of sys42 that are currently mounted & clients
share [-F nfs] [-o options] [-d description] [pathname]
# share –o ro /export/sys44_data -- By default resources available with RW. Access decision is based on a comparison of the UID of the client and the owner.
The Share Command Options
ro Informs clients that the server accepts only read requests
rw Allows the server to accept read and write requests from the client
root=client Informs client that the root user on the specified client system or systems can
perform superuser-privileged requests on the share resource.
ro=access-list Allows read requests from the specified access list
rw=access-list Allows RW requests from the specified access list
Access List Options
access-list=client:client Allows access based on a colon-separated list of clients
access-list=@network Allows access based on a network number (eg @192.168.100
or a network name eg. @mynet.com). The network name must
be defined in the /etc/networks file
access-list=.domain Allows access based on a DNS domain
access-list=netgroup_name Allows access based on a config net group (NIS) or (NIS+)
anon=n Sets n to be the effective user ID (EUID) of anonymous users.
By default, anonumous users are given the EUID 6001-nobody
user. If n is set to –1, access is denied.
# share –F nfs –o r0 direcctory -- Restricts access to read-only access.
# share –F nfs –o r0,rw=client1 directory
-- Restricts access to read-only, however, the NFS server accepts both read & write requests from the client client1
# share –F nfs –o root=client2 directory
-- Allows the root user on the client named client2 to have superuser access to the NFS mounted resources
# share –F nfs –o ro,anon=0 directory
-- By setting the option anon=0, the EUID for access to shared resources by an anonymous user is set to 0. The access is also set to read only.
# share
- /export/sys44_data ro “”
Managing the NFS Client
NFS Client Files
/etc/vfstab Defines FS to be mounted locally
/etc/mnttab Lists currently mounted FS including automounted directories.
/etc/dfs/fstypes Lists the default FS types for remote FS
NFS Client Daemons
The NFS client daemons are started using the /etc/rc2.d/S73nfs.client script
statd Works with the lockd daemon to provide crash recovery functions
lockd Supports record-locking operations on NFS files
/etc/init.d/nfs.client start (or) stop
NFS Client Commands
dfshares Lists available shared resources from a remote or local NFS server
mount Attach a file resource to a specified local mount point
umount Unmounts a currently mounted file resources
mountall Mounts all file resources or a specified group of file resources listed in the
/etc/vfstab file with a mount at boot value of yes
umountall Unmounts all non-critical local and remote file resources
dfmounts Displays a list of currently mounted NFS server directories
mount [-F nfs] [-o options] server:pathname mount-point
# mount sys44:/export/sys44_data /export/remote-data
# mount –o ro sys45,sys43,sys41:/multi_home_data /remote_shared_data
-- When mounting a read-only remote resources, you can specify a comma separated list of sources for the remote resources. Which are then used as a list of failover resources
# umount /export/remote-data -- Unmounting remote FS from the client
# mountall –r -- To limit the action of this command to remote file resources.
# umountall –r -- To unmount all remote file systems
Mounting Remote Resources at Boot Time
Enter appropriate entries in the client’s /etc/vfstab file to mount the remote file resources at boot time.
# vi /etc/vfstab
sys44:/export/sys44_data - /export/remote-data nfs - yes soft,bg
Mount Command Options
rw | ro Read/Write or read-only. The default is read/write
bg | fg Retry to mount in background or foreground. The default is to retry in the foreground soft | hard Soft option reports an error on the request, and stop trying when retrans=n
reach. Whereas hard option prints a warning message and continue to try.
Default is hard mount
intr | nointr Enables or disabled the use of KB interrupts to kill aprocess that hangs on a
hard-mounted FS. The default is intr.
suid | nosuid Indicates whether to enable setuid execution. Default is setuid execution
timeo=n Sets the timeout to n tenth of a second. The default timemout is 11, measures
in one-tenth of a second for UDP and 600 tenths of a second for TCP.
retry=n Sets the no of times to retry the mount operation. Default is 10,000 times
retrans=n Sets the number of NFS retransmission to n. The default is 5 for UDP.
Enabling the NFS Server Logging
nfslogd daemon responsible for NFS logging
The /etc/nfs/nfslog.conf file defines the path, file names, and type of logging that the nfslogd daemon must use. There is a taq corresponding to each definition.
Eg. Of nfslog.conf file
# NFS server log configuration file
global defaultdir=/var/nfs \
log=nfslog fhtable=fhtable buffer=nfslog_workbuffer
defaultdir=dir_path -- Specifies the default parent directory
log=logfile_pat -- Specifies relative or absolute path and the filename for the ASCII log file
fhtable=table_path -- Specifies path and the filename for the file-handle-to-path DB file
buffer=buffer_path -- Specifies path and the filename for the raw buffer file
log format=basic | extended -- Specifies the format when creating user-redable log files
To easily identify the log files for different shared resources, place them in separate dir. For eg.
# cat /etc/nfs/nfslog.conf
global defaultdir=/var/nfs \
log=nfslog fhtable=fhtable buffer=nfslog-workbuffer
public defaultdir=/var/nfs/public \
log=nfslog fhtable=fhtable buffer=nfslog-workbuffer
Create the /var/nfs/public directory before starting NFS server logging
Specify a tag by entering the tag to use with the log=taq option in the /etc/dfs/dfstab file. Use the log option without specifying a taq, which mean use the default global tag
share –F nfs –o ro,log /export/sys44_date
/etc/default/nfslogd -- The config info file controls the logging behavior of the nfslogd daemon.
Managing Crash Dumps & Core Files
When an OS has a fatal error, it generates a crash dump file (crash dump). When a process has a fatal error, it generates a core file.
If the Solaris OE kernel encounters a problem or when an unexpected hardware fault occurs, the panic routine is executed. Where memory contents are copied to a disk partition defined as a dump device.
When an OS crashes, the savecore command is automatically executed during a boot. The savecore command retrieves the crash dump from the dump device and the writes the crash dump to a pair of files in your FS.
It places kernel core info in the /var/crash/nodename/vmcore.X file
It places name list info & table info in the /var/crash/nodename/unix.X file
By default, the dump device is a swap partition. The swap partition contains temp data, therefore permanent data is overwritten by the crash dump.
# dumpadm -- To view the current dump configuration
Dump Content : Kernel pages (or) Application Pages (or) All
Dump device : /dev/dsk/c0t0d0s1 (swap)
Savecore directory : /var/crash/host1
Savecore enabled : yes
# cat /etc/dumpadm.conf -- Content of dumpadm command
Changing the Crash Dump configuration
/usr/sbin/dumpadm [-nuy] [-c content-type] [-d dump-device] [-m mink | minm \ min%] [-r root-dir] [-s savecore-dir]
-n Modifies the dump config so it does not run the savecore command automatically on
reboot
-u Forcibly updates the kernel dump config based on the contents of /etc/dumpadm.conf
-y Modifies the dump config so that the savecore command is run automatically on
reboot. This is default
-c content-type The content type can be kernel, all, or curproc. The curproc includes
the kernel, memoty pages and the memory page of the currently executing process
-d dump-device The dump device cab be an absolute path of swap
-m mink | minm | min% Creates a minfree file in the current savecore-dir
-r root-dir Specifies an alternative root directory relative to which dumpadm
command should create files. The default root dir “/” is used.
-s savecore-dir To mention savefiles dir. The default is /var/crash/hostname
Managing Core File Behavior
A core file is a point-in-time copy (snapshot) of the RAM allocated to a process. The copy is written to a more permanent medium, such as a HDD. A core file is useful in analyzing why a particular program crashed.
When a core file occurs, the OS generated two possible copies of the core files, one copy known as the global core file and the other copy known as per process core file. All depends on options in effect. Global core file is created in mode 600 and is owned by the superuser. Ordinary per-process core files are created in mode 600 under the credentials of the process.
# coreadm -- Displays the currnet core file config
global core file pattern : -- Identifies the name to use for core files placed in global directory
init core file pattern : core -- Identified the default name that per-process core files must use
global core dumps : disabled -- Indicates global core files are disabled
per-process core dumps : enabled
global setid core dumps : disabled
per-process setid core dumps : disabled
global core dump logging : disabled
# cat /etc/coreadm.conf -- Content of coreadm command
You can enable or disable two configurable core file paths, per-process and global, separately. If a global core file path is enabled and set to /corefiles/core, for eg. Then each process that terminates abnormally produces two core files: One in the current working directory, and one in the /corefiles/core directory.
coreadm [-p pattern] [pid]………. -- Users can run this command
coreadm [-g pattern] [-I pattern] [-d option……] [-e option…..] -- only root user can run
-i pattern Sets the per-process core file name pattern from init to pattern
-e option Enables the specified core file option
global Enables core dumps by using the global core pattern
process Enables core dumps by using the per-process core pattern
global-setid Enables setid core dump by using the global core pattern
proc-setid Enables setid core dumps by using the per-process core pattern
log Generates a syslog (3) message when a user attempts to generate a
global core file
-d option Disables the specified core file option. See the –e option for possible options
-u Updates system-wide core file options from the config file /etc/coreadm.conf.
-g pattern Sets the global core file name pattern to pattern. The pattern must start with a /
-p pattern Sets the per-process core file name pattern to pattern.
Pattern options for the coreadm Command
%p PID
%u EUID
%g EGID
%f Executable file name
%n System node name (uname –n)
%m Machine hardware name (uname –m)
%t The time in seconds since midnight jan 1 1970
%% Literal %
# coreadm –p core.%f.%p $$ -- When executed from a users $HOME/.profile (or) .login file sets the core file name pattern for all processes run during the login session. The $$ variable is the PID of the currently running shell. The per-process core file name pattern is inherited by all child processes.
# coreadm –p $HOME/corefiles/%n.%f.%p $$ -- This command places all of the user’s core files into the corefiles subdirectory of users home directory, differentiated by the system node name.
# coreadm –g /var/core/core.%f.%p –e global -- This sets system-wide parameters that add the executable filename and PID to the name of any core file that is created.
# coreadm -- to verify that this parameter is now part of the core file configuration
# coreadm 278 5678 -- Search for the core dump file. Only the owner of a process or the superuser can query a process by using the coreadm command with a list of PIDs.
Subscribe to:
Posts (Atom)
Custom Search
Feeds from my other blog
Samsung S2 Brand new for 25900 White piece sealed box
For Sale, Mobile Phones - Accessories in India, Andhra Pradesh, Hyderabad. Date September 17